BATTALIONS OF THE ROYAL SCOTS (THE ROYAL REGIMENT) IN THE 2nd WORLD WAR
On the outbreak of War on 3 September 1939 The Regiment consisted of 5 battalions, two Regular and three Territorial (TA). The 1st Battalion was at Aldershot having moved there on return from an operational tour in Palestine throughout 1938 during which they had lost 15 killed and 42 wounded. The 2nd Battalion were in Hong Kong where they had arrived in January1938 having left England in 1926 for Egypt then successively China (Shanghai) and Quetta and Lahore in India. The TA battalions were the 4th/5th (Queen’s Edinburgh) which had converted to a searchlight regiment in January 1939 so were, de facto, part of The Royal Artillery, the 7th/9th (Highlanders) based in Edinburgh and the recently reformed 8th (Lothians and Peebles) Battalion based temporarily with the 7th/9th but with Companies outside Edinburgh as their title indicated. The Regimental HQ and Depot was at Glencorse Barracks at Penicuik, south of Edinburgh. The 5 existing Battalions in 1939 immediately mobilised.
The 1st Battalion were virtually destroyed defending Dunkirk but a new 1st Battalion was immediately formed in England. Similarly the 2nd Battalion were all killed, or captured at Hong Kong in December 1941. On 16 January 1942 the Army Council redesignated the 12th Battalion as the 2nd Battalion.
An outline of the War Service is given for each Battalion below with fuller information under Further Reading. PPB denotes Pontius Pilate’s Bodyguard Volume 2. The official Regimental WW2 history is The First of Foot by Augustus Muir published by The Royal Scots History Committee in 1961
. Transcribed copies of the War Diaries of each of the Battalions can be found at:
https://www.royalscotskosbwardiaries.co.uk/
1st Battalion.
The Battalion deployed to France with the BEF on 21 September as part of 2nd Division and spent the ‘Phoney War’, other than 3 weeks over New Year when they deployed to the Maginot Line, on the Franco-Belgian Border at the large village of Lecelles, some 10 miles due south of Tournai in Belgium. On 10 May 1940 the Germans invaded Belgium and the Battalion moved forward to its pre-arranged deployment position at Wavre on the river Dyle, only some 5 miles east of Waterloo. They remained there without contact with the Germans, apart from bombing, until the night of 15/16 May when they were ordered to withdraw as the German advance threatened to cut off the BEF from the Channel ports. The withdrawal continued with only minor contact with the enemy. By the 21st the Battalion was holding a position on the River Escaut just south of Tournai. The Battalion was in continuous action all day, suffering over 150 casualties but not losing an inch of ground. The fighting continued the next day, losing a further 50 casualties, until the Battalion was ordered to resume the withdrawal that night. This continued until 26 May when the 2nd Division was ordered to fight ‘to the last round and last man’ as part of an outer defensive perimeter, beyond artillery range, to cover the evacuation from Dunkirk. After a desperate defence, together with the 2nd Battalion The Royal Norfolk Regiment, of the Bethune-Merville road in the area of the village of Le Paradis, and after appalling losses and virtually out of ammunition, 1 RS had effectively ceased to exist by 30 May. They, with the Norfolks, had disrupted the German advance for three critical days during which a closer defensive line had been created around Dunkirk and the evacuation had been organised and got well under way. It was at Le Paradis that almost 100 soldiers of the Norfolks were massacred after surrendering to the Totenkopf SS Regiment. Only a handful of Royal Scots made it back to England with 292 eventually becoming prisoners of war. Close to 500 had been killed or wounded including, amongst the latter, Lieutenant Colonel Money the Commanding Officer. He was seriously wounded on 27 May and evacuated to a dressing station at La Gorgue, the very spot he had been taken to 25 years earlier when wounded in the Great War. Eventually he made it back to England over the beach at Dunkirk. Perhaps the greatest tributes to the Battalion were paid not by members of the Regiment or the British Chain of Command. Lieutenant Michel Martell of the famous French brandy family and the Battalion’s French Liaison officer. He wrote to the, by now, Brigadier Money after the war saying ‘Your Battalion was the most wonderful anyone could have hoped to command and, during the five years we waited for our freedom (he was a POW), after living with The Royal Scots, I could never despair of seeing Germany beaten’. The other was from a German officer who escorted some wounded Royal Scots to a French hospital. On handing them over to the Chaplain there he stated ‘They fought like lions’. Defence of Escaut was subsequently awarded as a Battle Honour and carried on the Queens Colour. With the Norfolks we sought Le Paradis as a separate Honour but the Honours Committee ruled that it was covered by the 4 Brigade Honour of St Omer-La-Bassee.
Further Reading: WW2 Essay Le Paradis, The Thistle January 1946 and PPB pp 67-92
The ‘new’ 1st Battalion.
Within days of the completion of the Dunkirk evacuation the 1st Battalion was reconstituted at Bradford in Yorkshire under the command of a Royal Scot, Lieutenant Colonel Purves MC. It was made up of some 250 Royal Scots, drawn from various sources, and 600 men straight out of initial training. It soon moved to Great Driffield and, while beginning to train as companies and a battalion, was responsible for coastal defence over a 50 mile length of the Yorkshire coast. In December 1941 it moved to Burford in Oxfordshire for intensive training where it received visits successively from HM King George VI, HRH The Princess Royal and the Prime Minister, Winston Churchill. On 15 April it sailed from the Clyde, again as part of the 2nd Division, on the transport Orbita for an unknown destination. Also on board were their old friends 2nd Battalion The Royal Norfolks. After a brief stop at Cape Town, with some time ashore on training, the ‘unknown destination’ proved to be Bombay (Mumbai) in India which they reached on 10 June. On disembarking they moved to Poona, inland in the hills.
Due largely to the monsoon the operational situation on the Indo-Burmese frontier had reached stalemate and, therefore, the second half of 1942 was devoted to training. There were regular long route marches, opportunities for field firing, special boat drills and some elementary combined operations and jungle warfare training. The training increased steadily in intensity and complexity. In late 1942, the Battalion moved from 4 to 6 Brigade, which was training for a special operation. In December the Battalion move to Calcutta and then, by air, to Chittagong
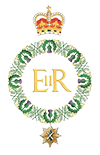
The first Arakan campaign had begun in late September 1942 as the first counter-attack against the Japanese. The plan was to advance down the coast from Cox’s Bazaar to seize the Mayu Peninsula, followed by a seaborne assault on Akyab Island to capture the Japanese airfields there. This last phase was the planned objective for 6 Brigade but the Japanese halted the advance near the end of the Peninsula and 6 Brigade were committed on 18 March 1943 to try and clear the Japanese positions, They failed to do so and, by early April, were at risk of being cut off by a Japanese hook to the sea further to their north. Slowly the Brigade withdrew north from position to position with many fierce fights leading to considerable casualties en route, particularly amongst the officers. By 13 May, with the monsoon imminent, and the long-expected Japanese attack on the Brigade position at the north end of the Peninsula started, a further withdrawal to the ‘monsoon line’, some 50 miles south from the Indo-Burmese border took place. The campaign had been a costly failure but the Japanese had been held at the gates of India. In late May the Battalion withdrew into India and on the 24th it entrained for Chittagong, In mid-March the Battalion's strength had been 39 officers and 691 soldiers. Casualties had been 6 officers and 26 soldiers killed, 10 and 117 wounded and 1 and 51 missing – a total of 17 and 194. A further 550 had succumbed to sickness, mainly malaria. During the campaign it had received 500 reinforcements but, even with these, by the time it left Chittagong, it had been reduced to just 400 all ranks.
The Battalion then moved back to the Bombay area where it rejoined 4 Brigade and undertook an intensive period of anti-malarial medication during which no serious training, or exercise, was carried out. Once completed substantial reinforcements were received, taking the strength to almost 900 all ranks, and a comprehensive period of re-training began. At the end of January 1944 the Division moved to Belgaum in the central Ganges plain where it was possible to undertake intensive jungle training. They learnt that the jungle was their friend – you can not only live in it but also on it – you can find all you need to keep you alive there. More importantly they learnt to believe that they could beat the Japanese in it. This, and the subsequent deployment of 2nd Division to counter the major Japanese offensive westward towards Kohima and Imphal, in particular the Battalion’s role in the holding of Kohima and the subsequent defeat of the Japanese there is described in the essay ‘The Kohima Campaign 1944’ found in the WW2 essays. The Battle Honour Kohima is carried on The Queen’s Colour.
Burma, 1943-1945, 1st Battalion, The Royal Scots
Towards the end of June the Battalion moved back to a position on the road to Imphal some 12 miles south of Kohima where it carried out training for two weeks. It then moved some 20 miles across country to the east, but 40 miles by march route, to establish a Battalion patrol base at Sangshack from which to scour the surrounding country for any signs of the enemy. There were none. From 21 August to 5 September it mounted a Battalion fighting patrol, supported by 140 mules, to ensure there were no Japanese operating west of the Chindwin. None were found but the operation was very seriously handicapped by the complete breakdown of the supply system which had been based on air drops and which, overall, were a failure. The column often operated above 6,000 feet, the maps were almost useless. The monsoon had begun many weeks earlier and what tracks there were, were veritable quagmires. Mules often slipped from these down the steep slopes and their loads had to be manpacked up again. A number of mules died and mule and bamboo became the main diet in the absence of any other rations. The Battalion covered between 100 and 150 miles over 16 days on 10 days rations before returning, starving, to Sangshak which they left on 11 September to return to the Kohima – Imphal road. The Battalion remained there, on a non-operational basis, until 2 December during which on, 25 November, the Battalion memorial to those killed in the Kohima battle was unveiled and dedicated at Kennedy Hill on the Aradura Spur.
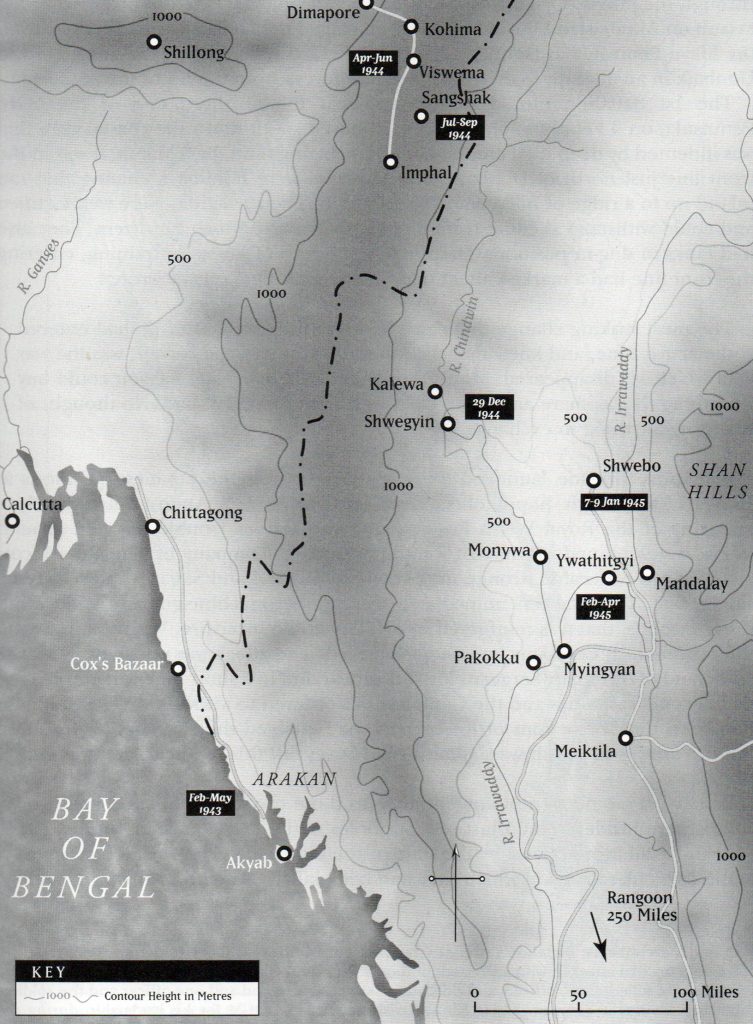
On 2 December the Battalion moved further south to below Imphal. It was apparent that they would return to battle soon, so Christmas was brought forward to 21 December. Captain Tom Drysdale, the QM, with the help of the Pioneer platoon made a large clearing in the jungle in which they constructed a huge U-shaped table at which, after a carol service, the whole Battalion sat down together for a memorable ‘Christmas’ lunch. As they had guessed, they were on the move on Boxing Day and by the 29th had reached Kalewa on the Chindwin, where they embarked on floats which were towed down to Shwegyin. On 7 January they made first contact with the Japanese some 8 miles north-west of Shwebo, defending possible routes to crossing sites on the Irrawaddy. On 9 January the Battalion forced the canal bridge (later found to be mined with a 250 lb aerial bomb) and the main road bridge across a moat, opening the way into the town. On 29 January, by now on the open plains leading to Mandalay, orders were received to capture the strongly held village of Ywathitgyi on the North bank of the Irrawaddy, the defenders of which had to be taken out before any crossing could be contemplated. The thickly wooded village stretched for about one and a half miles along the river and was about 500 yards wide. It was defended by a reinforced company with several MMGs and LMGs and was supported by guns and mortars firing from the south bank. A major undertaking for just one battalion but there were no others immediately available.
Ywathitgyi – CO’s O Gp
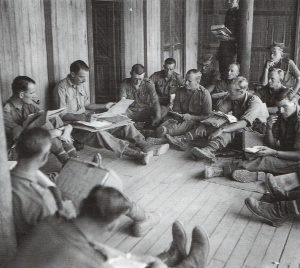
Assault Pioneer platoon preparing for battle
The battle began on 31 January with an air strike by 8 squadrons of light and fighter bombers which lasted for 30 minutes, followed by A and B Companies, supported by tanks and Wasps (carriers equipped with flame throwers), assaulting the eastern end of the village. Initial progress was quick but, after breaking into the village, met well prepared and very difficult to pin-point enemy positions and each one had to be dealt with separately. Only about two-thirds of the village had been secured by nightfall when the attacking companies went firm. That night patrols failed to locate any enemy in the village, and the following day there was little change in the overall position. During the day, however, plans were made for the attack to be resumed on 2 February. This attack was preceded by a further air strike from three squadrons of Thunderbolt fighter bombers, and supported by a squadron of tanks and the fire of seven batteries of guns. By the end of the day the Battalion had secured the rest of the village and consolidated for the night. Much movement was heard in the village, mostly Japanese who had been cut off trying to reach and cross the river. Two parties were fired on, one in a boat which was engaged and sunk by machine gun fire, and the other trying to launch a sampan which was grenaded. Screams and groans were heard from both but it was impossible to assess casualties in the dark. Mopping up operations continued on the morning of the 3rd and the village was declared clear of enemy by mid-day. RS casualties were 15 killed and 37 wounded, Japanese as at least 60 killed and 4 prisoners taken. GOC 2 Division described the operation as ‘one of the most formidable Battalion tasks that my Division undertook in Burma’
The remainder of February was largely uneventful and the Battalion eventually crossed the Irrawaddy by pontoon on 28 February, the last battalion of 2 Division to do so. On 5 March the Battalion, supported by a squadron of Sherman tanks and a troop of Wasps, attacked an area of pagodas about 5 miles south of the river with immediate success. Thirty Japanese bodies were counted, including an officer, and a considerable amount of documents and small items of equipment found, for the loss of one wounded. This was followed by further small actions all of which were convincingly won by the Battalion. Late March and early April saw the Battalion advance towards Mandalay but, by the time they reached it, the Japanese had been beaten and were withdrawing to the south. On 28 March the Battalion moved by vehicle to the area of Pyzni some forty miles to the south-west with the task of destroying those Japanese forces trying to escape over the Shan Hills to the north-east. On the night of 3-4 April, after discovering one of the routes the Japanese were using, D Company mounted what the Divisional Commander described as ‘a classic ambush’. They killed 53 Japanese in it and large quantities of weapons, ammunition, other equipment and documents were seized for the loss of one killed and one wounded. It was the last major action by the Battalion and was a brilliant example of how they, along with the other British, Indian and Gurkha troops in General Slim’s 14th Army, had proved they were better soldiers than the Japanese. It had taken several years but, in the end, the Japanese Army had been beaten fighting in its own environment.
On 10 April the Battalion flew to Chittagong and, on 13 April, began to arrive near Calcutta where it started to refit and retrain for the assault on Rangoon but, before they were called forward, Rangoon had fallen. For the 1st Battalion the war in Burma was over.
Aftermath. Although the 1st Battalion’s war was over, the Battalion itself did not return to the UK until January 1948. Once the war with Japan finished in September many individuals were demobilised and new drafts, totalling 550, arrived in October. When the Battalion left Bombay in December it was, therefore, effectively a new or, at least, a different one. Initially it was understood its destination was Hong Kong but this changed to Singapore en route, where it arrived on 28 December in time to celebrate New Year. It spent a year moving between various locations on the mainland of Malaya and Singapore island before moving in January 1946 to Karachi in India, soon to be Pakistan. It was at a strength of only some 300, of which a few were still Burma veterans, but drafts, including some Danish soldiers who had volunteered to serve in the British Army to gain experience, took it back to over 500. They provided the Guard of Honour for Earl Mountbatten, the last Viceroy and Mr Jinnah the first Governor General of Pakistan, at the ceremony on 14 August in Karachi at which Pakistan gained nationhood. The Battalion sailed for home in mid-December, arriving back not far short of six years since they left the Clyde.
Further Reading: WW2 Essay The Kohima Campaign,1944; The Thistle January 1946 - Kohima, April 1946- Arakan and July 1946 – Mandalay; PPB 133-165.
2nd Battalion.
The Battalion moved to Hong Kong from Lahore in India in January 1938, the year after the Chiefs of Staff in London had concluded that, although a four battalion garrison could not hold the Colony, it should neither be reinforced nor evacuated. This became even more relevant after the start of the Sino-Japanese war in 1938. Even before the outbreak of war with Japan, it was realised that from a military standpoint the colony was a liability rather than an asset. The emergence of Japan as a strong naval and air power and the development of Formosa by then had rendered Hong Kong indefensible as an independent strategic point. On 7 January 1941, by which time the Japanese had pushed the Nationalist Chinese beyond the Colony’s land border, the Prime Minister, Winston Churchill, wrote ‘There is not the slightest chance of holding Hong Kong or relieving it. Instead of increasing the garrison (still at four battalions with supporting arms and services plus a locally enlisted Volunteer Defence Force) it should be reduced to symbolic scale….’. Everything that follows should be seen in the light of these statements.
Hong Kong consisted of the Island and the New Territories, or Mainland, across a strait less than a mile wide at its narrowest point. The Island, which is mountainous, measures a maximum of 12 miles from east to west and 7 miles from North to South. The capital, Victoria, on the north shore looked across to Kowloon, which housed the bulk of the population. From there the Mainland stretched north, through mountainous and sparsely populated country, to the Chinese border some 20 miles away. Only two roads, one hugging the west and the other, together with a railway line, the east, ran north from Kowloon both meeting at Fanling before the border.
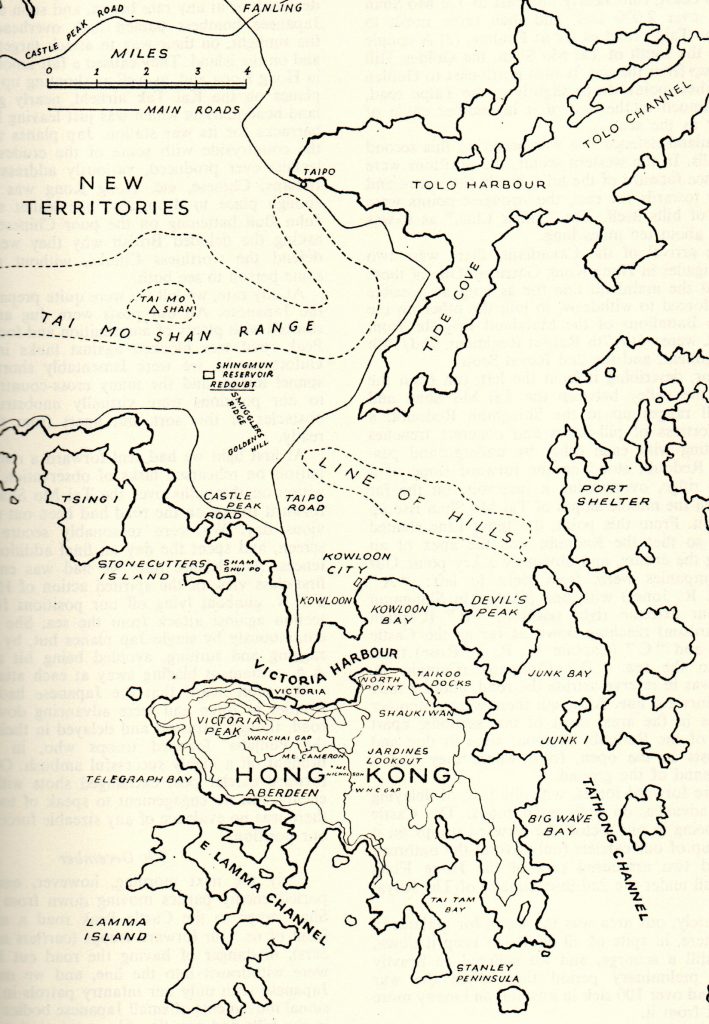
Hong Kong 1941 – Area of operations
The Battle for Hong Kong was undoubtedly the most contentious action that the Regiment was involved in during WW 2. Although nominally involving two Brigades it was in practice, particularly on the Mainland, a series of actions fought by individual battalions and companies with, usually, very little support. This essay therefore leads off with considerable background to set the scene. Equally it would be too large an undertaking in this potted history to describe all the actual fighting from 8 December up to the surrender on 25 December, and the aftermath in the Japanese POW camps. Those seeking further information are therefore urged to follow up the sources quoted in Further Reading at the end – and, in particular, the War Diary written up by the CO Lt Col White, in 1945 after his release from captivity but from detailed notes made and hidden while a POW
In the summer of 1940 all The Royal Scots families, some 40 in total, with the exception of one or two wives who were members of the Nursing Detachment of the Volunteers, were evacuated to Australia. The Colours and silver were sent to Singapore for safekeeping there. They subsequently fell into the hands of the Japanese but, remarkably, the Regimental Colour and most of the silver, were recovered after the Japanese surrender in 1945. At much the same time the Battalion’s efforts to prepare for war were severely hampered by the posting out (known as milking) of experienced officers, warrant officers and NCOs to form new units or fill staff or training appointments at home. By way of example, by the time of the Japanese attack in December, there were only four officers in the Battalion holding regular commissions.
In spite of Churchill’s letter, in November 1941 the Garrison was ‘reinforced’, by the arrival of two partially trained Canadian battalions without their transport or support weapons. Until then 2 RS had been responsible for, and trained on and for, the defence of a sector of the Island. They had little or no knowledge of the Mainland. The additional manpower however allowed the GOC to adopt a new defence plan, resurrecting one that had been abandoned in 1938, through the creation of two, three-battalion brigades. One, consisting of 2 RS and two Indian battalions, occupying the ‘Inner Line’ on the Mainland some five miles north of Kowloon, and the other, the Island Brigade, composed of 2nd Battalion The Middlesex Regiment (2 MX), a machine gun battalion occupying a number of pillboxes around the coast of the island, and the two Canadian battalions. The ‘Inner Line’ stretched for some eleven miles from near Gin Drinkers Bay in the west to Port Shelter in the east. Some limited defence preparations had been begun in 1938 but no work had taken place since then and much of what had taken place was now in a state of total disrepair. The Inner Line had originally been planned to be held by at least a Division. The textbook norm for a Battalion frontage in such a position was 1000 yards. 2 RS, on the western end of the Line, were now allocated a frontage of some 5,000 yards running from west to east over heavily wooded hills with valleys bisecting it on roughly a north to south axis. The GOC who, like many at that time, believed that the Japanese were an inferior enemy, and did not accept intelligence reports of a significant build-up on the frontier, believed that the line could be held for seven days, allowing time to destroy the port facilities, thereby denying the main strategic objective of Hong Kong to the Japanese.
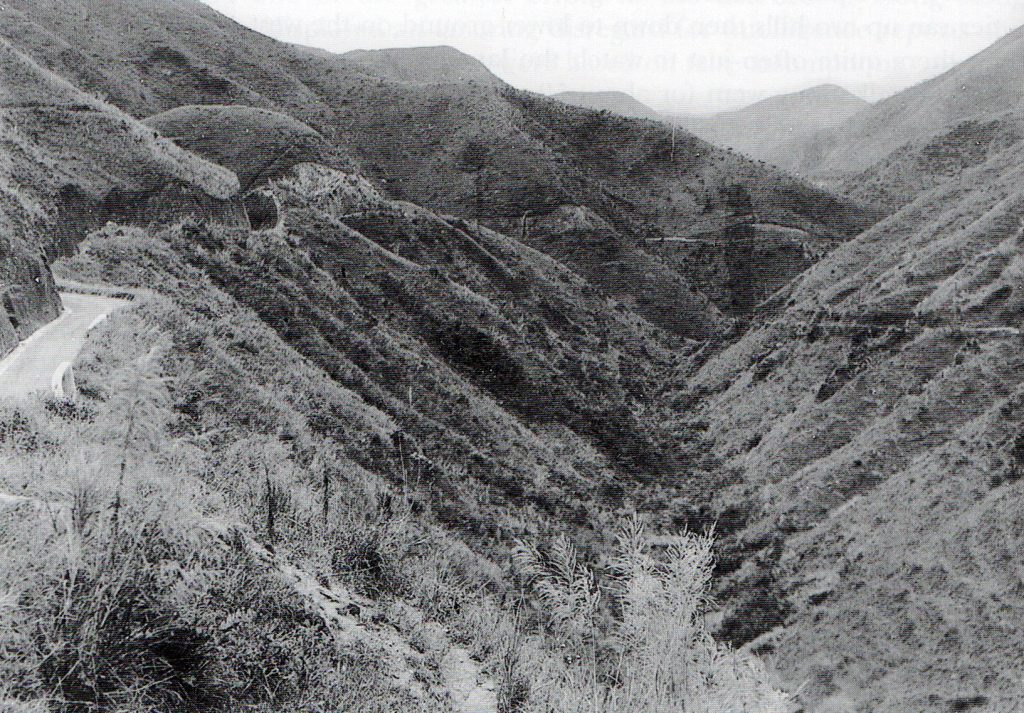
The Countryside in the New Territories on the Mainland in 1941
At the end of September Lieutenant Colonel Simon White MC, who had been Second-in-Command of the Battalion, took over command. This coincided with the Battalion’s annual period of intensive training on the Mainland close to the border. This training was, however, interrupted as Companies progressively moved to their defence locations allocated under the new plan to repair, refurbish and, where required, replace and improve the limited work that had been undertaken in 1938. There was a lot to do and preparations were hampered by restrictions imposed by the civil government on such areas as the ranging of the Vickers MMGs and the laying of anti-personnel mines, of which only 90 were eventually issued to the Battalion, a fraction of what was needed to cover the many approaches into the area. Most, but by no means all, of the preparations had been completed by 7 December. There had, however, been little, if any, time to rehearse or co-ordinate patrol routes or procedures. Counter-attack routes had been reconnoitred by the CO and company commanders but there had been no time for platoon commanders to do so or for troops to rehearse the plans. Similarly, and critically, there had been no planning or rehearsals of withdrawal routes. All were planned for the week ending 13 December but, by then, it was too late. The Japanese had already overrun the Mainland.
There was another, more disturbing, restriction on the demanding physical work that is inherent in the preparation of a defensive position in such a rocky area – the effect of malaria. This had been a problem before the Battalion deployed to work on its new positions, but it soon got much worse as the area was considered to be the worst for malaria in the whole Colony, with an estimated rate of 75% incidence of it among any British troops stationed there. At that time there was no preventative medicine for malaria, only a daily dose of quinine which reduced the effect but gave no immunity. On 28 November the Battalion established a convalescent camp on the coast just north of Kowloon under the Battalion Medical Officer. 180 members of the Battalion were treated there but it took time for individuals to build up their strength after they recovered. There were still about 70 in the camp when hostilities commenced. They were sent back to duty but were of very limited value.
The vital ground for the Mainland Inner Line was considered to be the Shing Mun feature on which the ‘Redoubt’ had been built in 1938. The name is misleading as it suggests a compact field fortification. In practice it consisted of 12 acres (6 football pitches) of a rocky and precipitous hillside, with a perimeter of at least three-quarters of a mile with some barbed wire as its outer defence. It is a principle of defence that, to be effective, any such wire obstacles must be covered by observation and fire. For much of its length, with the numbers available, it would have been difficult to achieve this by day and quite impossible at night, in particular if a patrol was out reducing the manpower available as sentries. At various points on the feature were five pillboxes, designed and sited to hold MMGs with their long range capability rather than to cover the ‘dead ground’ to their immediate front. Some of these pillboxes were 2-400 yards apart, linked by tunnels and trenches. On the high ground to the rear (south) of the position a concrete emplacement had been built into the hillside as an artillery observation post but this could not observe the ground immediately to the front (north) of the Redoubt or the most likely approach, the dam across the river itself. As a strong point with such a key role in the defence plan, the Redoubt was, at best, makeshift, and then only with a proper force of at least a company within it rather than the platoon of 27 allocated to it. 12 of these were committed to manning 4 Vickers MMGs leaving a maximum of 15 to watch the perimeter, and the dead ground beyond it, this became even more difficult at night when the orders required each Company to put out three fighting patrols of 9 during the night. The GOC, Major General Maltby, visited the Redoubt in late November and, in spite of being shown its deficiencies, the difficulty of defending it at close quarters with the lack of manpower, and the one mile gap to the Punjabis on its right rear flank, confirmed that it was his view ‘that it was the key to the entire defence system’. Furthermore with proper vigilance and resolution, and given adequate artillery support, he believed the single platoon could hold the Redoubt against the Japanese for at least a week. This was the same General who considered the Japanese an inferior enemy who could not operate at night, did not accept the intelligence suggesting an immediate Japanese attack and, on 19 November, had signalled to the War Office referring to holding the Inner Line permanently.
This shortfall in numbers was reflected throughout the Battalion. On 8 December the strength was given as 33 Officers and 738 soldiers against a war establishment, including first reinforcements, of 25 and 771. On paper, therefore the Battalion was close to full strength but the reality was very different. Two officers and 153 soldiers, mostly suffering from malaria, were listed as being in hospital or convalescing following hospital treatment, 2 officers and 2 soldiers were on courses in India and four officers and 14 soldiers were on detached duties within Hong Kong leaving an effective strength of 27 and 569, including the 70 from the Battalion convalescent camp, or a deficit of 200 against the war establishment. The brunt of this was borne by the rifle companies who averaged some 70 against the 100 establishment or, in simple terms, one platoon light out of three.

The Battle for the Mainland 8-11 December 1941 showing 2 RS’s Positions
By 7 December, on the eve of war, the Battalion, along with the rest of the Mainland Brigade was manning its battle positions. C Company, on the left, held the Texaco Peninsula, south of Castle Peak Road. B Company in the centre lay astride the Castle Peak Road and on the high ground east of the Pineapple Pass Road. A Company was on the right with Company HQ and 8 Platoon in the Redoubt, 7 Platoon on Pineapple Hill some 1000 yards to the west and 9 Platoon further to its left. D Company was in reserve on the western slopes of Golden Hill. ‘Forward troops’, under command of Major Burn, the Battalion 2ic, based around the five carriers of the carrier platoon supported by two Defence Volunteers armoured cars, were deployed up to the frontier tasked with delaying the Japanese main thrust, which, in the west, was expected to come down the Castle Peak Road. (Author’s Note. The conviction that the Japanese would follow the roads, ignoring their very real ability to move across country, be it through hills or jungle or both, probably accounted for too much emphasis being put on blocking these and led to a lack of numbers available in The Redoubt and its surrounds. A similar situation occurred in the defence of Malaya and Burma where our forces tended to tie themselves to the roads and were frequently outflanked. In the official account of the Hong Kong campaign the War Office historian emphasised that for many years the British Military attaches in Tokyo had been sending reports making it abundantly clear that, far from being a potentially inferior enemy, as many senior officers frequently stressed, the Japanese Army was a most efficient force with “with great physical endurance …..and could move across country at great speed and be self supporting for several days”.)
By dawn on the 8th December the Battalion was informed that Britain and Japan were at war and, at 0800, they saw Japanese aircraft flying south on a bombing raid to attack targets in Kowloon and on the Island. In the process they bombed Kai Tak airfield destroying on the ground the five obsolete RAF aircraft which would have provided the only air reconnaissance capability for the defenders. There was no fighter defence. The forward troops fell back in front of the advancing Japanese blowing demolitions on both the main roads as they did so. By early on the 9th it was clear that the Japanese were close to the Inner Line and at 0630 the forward troops were ordered to withdraw into the defensive line. With the now clear evidence that the Japanese could operate successfully at night, D Company of 5/7 Rajputs from the Brigade reserve were ordered forward to plug the gap between A Company and the 2/4 Punjabis, coming under command of the latter. Its primary role was to cover the approach from the north through the gap to the Tai Po road and its subsequent deployment could do little or nothing to cover the eastern side of the Redoubt and prevent, or at least disrupt, any approach down there to get onto Smugglers Ridge above and behind the Redoubt.
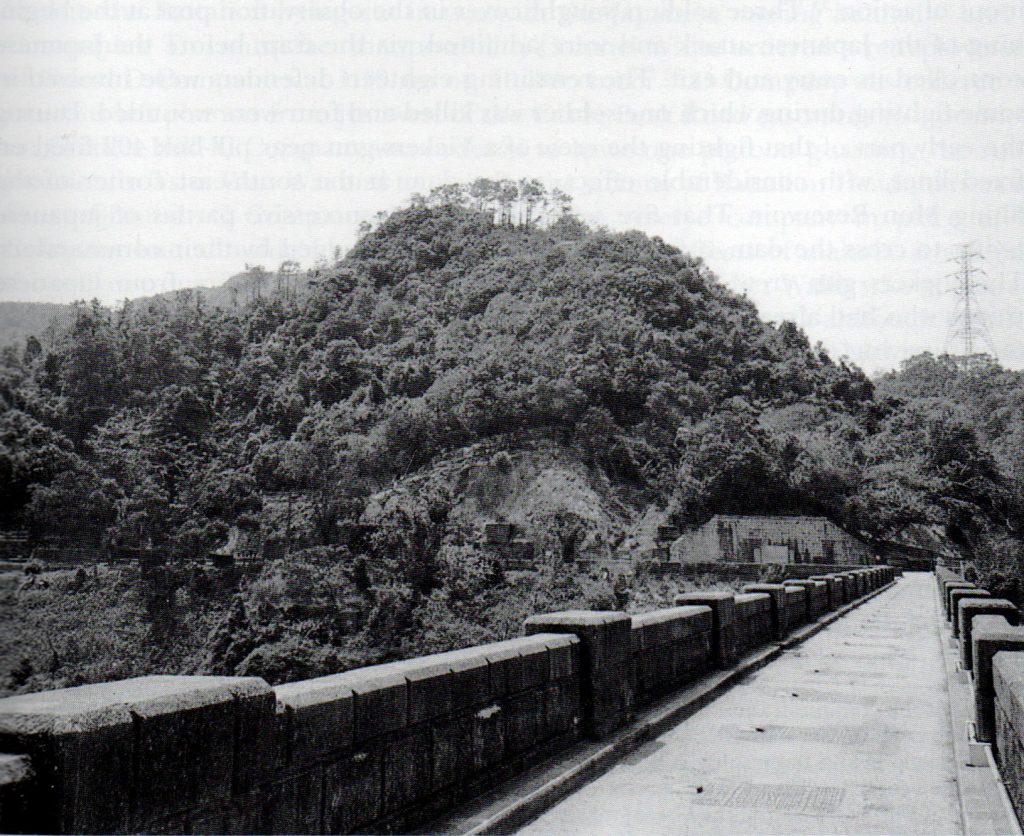
The Shing Mun Redoubt (on hill to the left of the road) taken from the North, the direction of the Japanese approach across the dam wall. Note what is a considerable amount of dead ground from below the crest of the hill. The pill boxes were set even further back. Taken in 2000.
During the day the Japanese 228 Regiment moved forward towards Monastery Ridge from where the CO was able to observe how weakly the Redoubt was held and that there were no defences on the obvious approaches. By the time it was dark, its III Battalion, which was to assault the Redoubt, was within 2,000 yards of its objective, both unsuspected and undetected, with a planned H hour of 2100. The night was dark with light rain and some ground mist. At 2000 a 10 man patrol, under Second Lieutenant Thomson, left the Redoubt to patrol to the southern slopes of Needle Hill, along the Shing Mun valley and check in with the Rajput Company HQ, which was sited towards the Tai Po road, before returning to the Redoubt. The patrol returned at 2220 having spent some time with the Rajputs but with nothing to report of the enemy. Thomson went to Company HQ, co-located within the Artillery OP in spite of orders that troops, unless specifically ordered to do so, were not to occupy pillboxes by night but to be outside in fighting positions. It would seem beyond doubt, in view of the short time that had elapsed, that Thomson did not patrol towards Needle Hill or down the Shing Mun River or he would have run head-on into the advancing Japanese. The first group of these, about 150 strong, reached the Northern perimeter of the Redoubt, undetected as they moved silently on the rocky terrain in their rubber-soled boots, at about 2215 and began cutting their way through the wire. They were detected by a sentry at about 2315 but, by then, they were already within the perimeter. A second party of Japanese, of similar size, had worked their way round onto Smugglers Ridge behind but above the Redoubt from where they also attacked the defenders. Due to a further error Company HQ found itself locked inside the Artillery OP, the sentry on the door having been sent on a task and locking the door behind him. Trapped inside, the OC, Captain Jones, was unable to effect any command over the defence of the Redoubt. At 0245 on the 10th the Japanese blew the roof off the Artillery OP and the Company Commander surrendered it. By that time, of the three officers and 15 who appear to have been in the OP when the Japanese attacked, two of the Indian Gunners within the post had been killed and the three officers and six soldiers were wounded. In the meantime the balance of the platoon, totalling 22, were fighting the attacking force. Four, manning the pillbox nearest the Dam, held out until the afternoon of 10 December when the pillbox received a direct hit from a British shell intended for the Japanese still on the position. All four were dug out alive by the Japanese. Of the now remaining 18, one was killed and three wounded before Sergeant Robb, the platoon Sergeant, out of contact with any of his officers, heavily outnumbered and realising that nothing could be gained by further resistance, led the remainder along the crest of Smugglers Ridge to join up with D Company of the Rajputs. The Redoubt, built on what was considered the vital ground for the defence of the Mainland, had fallen in some three hours from the initial contact. Extraordinarily, Captain Jones, the Company Commander, was taken back to it on 31 January 1942 by Lieutenant General Kitajima, the, by then, Japanese Commander-in-Chief in Hong Kong, to reconstruct the events of 9/10 December. He reported that, in the General’s opinion, the defences had three serious weaknesses:
- The Redoubt was not held in sufficient force. Failure to garrison it with at least one company was, he said. ‘absolutely fatal’. This was a cardinal error to which he constantly referred.
- The approaches were insufficiently patrolled.
- There was no obstacle on the dam. The General would have blocked it with wire and a minefield and placed a strong force of suicide troops in front. (Not a British tactic! - Author)
Due to a combination of basic errors of appreciation at the highest level, in particular in allocating troops to tasks across the Inner Line, and local failures at the tactical level in the lead up to and actual defence of the Redoubt, the route to Kowloon, and thence the Island, now lay wide open. The only hope of restoring the credibility of the Inner Line was to mount an immediate counter-attack to retake the Redoubt or its area. Considerable pressure was put on Colonel White to undertake one but there were many reasons why he resisted this. In simple terms the positions and immediate intentions of the Japanese were anything but clear before he could realistically launch an operation in the dark, which had neither been reconnoitred or rehearsed, over difficult ground and for which no obvious troops were available. Instead he redeployed the Battalion to face the threat of the Japanese advancing west from Smugglers Ridge down to Castle Bay Road and, thereby, cutting the Battalion in two. The GOC and Brigade Commander, neither of who were prepared to actually order a counter-attack, finally accepted at 1000 that there would not be one.
In fact the Japanese did not follow up their earlier successes (a failure on their part which was also noted in the Burma Campaign) and there was very little infantry action on the rest of the 10th. That night the Battalion withdrew to a new line of Smugglers Ridge – Golden Hill- Lai Chi Kok Peninsula. D Company held the right hand side of the ridge and Golden Hill itself. To its left was C Company reaching down to the Castle Peak Road with a carrier road block on its left flank. B Company was behind and slightly to the left of C, astride the Road. The two remaining platoons of A, which had withdrawn when the Redoubt fell, were in a reserve position down the road about half-a-mile behind B.
Two Japanese Battalions (some 2,000 men) followed up the withdrawal and initially attacked D company on Golden Hill. This began at first light on the 11th and continued through until the afternoon by which time D Company, effectively now only 8 strong, had halted the Japanese in the most important action during the fighting on the Mainland. Early on, while D Company had been holding the Japanese on Golden Hill two, possibly three, Japanese companies, supported by 4 inch mortars. had penetrated the gap between D Company and the rest of the Battalion. They attacked C Company from its flank. The Company was caught by surprise and, during some fierce fighting, ln which the Company had 22 casualties including both the OC and one platoon commander killed. Without contact with Battalion HQ, and having lost key commanders, C Company fell back on B, whose OC had also been killed early in the action. Some of B Company joined the unauthorised withdrawal but one platoon stood firm a little to the West of the Road until the arrival of the Battalion 2ic, plus the A Company platoons standing firm, meant the position began to stabilise. That night the Mainland Brigade, less the Rajputs on the extreme right in the Devils Peak Area, withdrew to the Island with, mostly as a result of D Company’s actions that day, little or no interference. The Battalion’s casualties over the fighting on the Mainland totalled 6 Officers and 32 soldiers killed and 67 wounded, excluding those lightly wounded who fought on. By way of comparison, and demonstrating how the weight of the Japanese attack had fallen almost exclusively on 2 RS, of the two Indian battalions involved the one that suffered most had just 11 casualties.
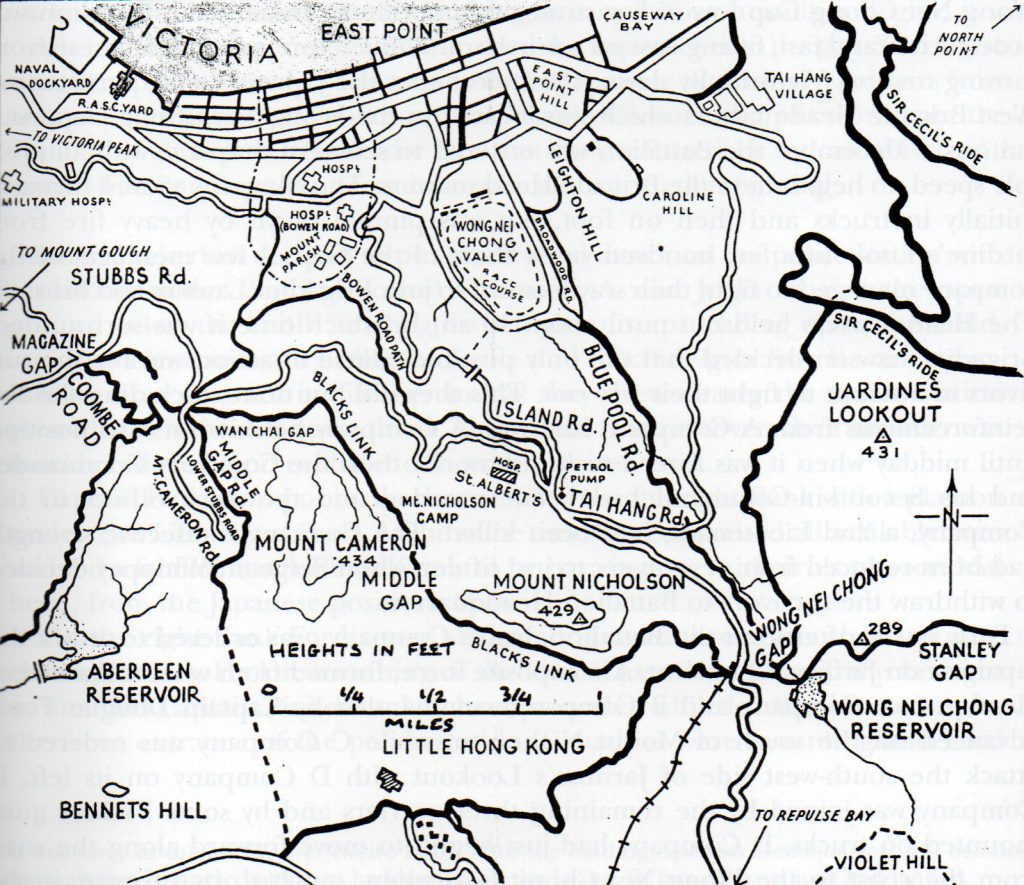
From 12 to 15 December the Battalion occupied positions on the north of the Island from Causeway Bay around to Tai Koo docks. All rifle Companies were reinforced to nearly full strength by men from Headquarter Company or the return from hospital of those who had recovered from malaria. Six officer reinforcements came from commissioning members of the local Volunteers and two Royal Scots officers returned from staff appointments on the Island to take command of B and C Companies whose OCs had both been killed on 11 December on the Mainland. At midnight on 13/14 December the GOC created an East and West Brigade. The Battalion formed part of the West Brigade commanded by a Canadian, Brigadier Lawson, with responsibility for the key area of Victoria, its hinterland and the strait facing the Mainland. Its HQ was in the Police Station and pre-War shelters at the Wong Nei Chong Gap (WNCG) where the main road from Causeway Bay to Stanley, Repulse Bay and the south crosses the ridge. The road effectively divides the island in two and, consequently, the Gap was of key strategic importance, the ‘Redoubt’ of the Island, and to play as significant a part in the coming battle as the latter position had on the Mainland.
On 16 December, to the Battalion’s surprise, it was ordered to hand over its positions to the Rajputs, who had withdrawn to the Island on the night of 13 December, and to move into a reserve position around the Wanchai Gap, some two-and-a-half miles to the north west of the WNCG. The original intention had been for the Battalion to help defend the latter but General Maltby expected the invasion to be launched from Kowloon in the west. He was wrong and the War Office historian subsequently said that his failure to concentrate adequate reserves in the vicinity of WNCG “resulted in the enemy being able to reach this vital point without meeting serious resistance.” As things turned out 2 RS were soon to bear much of the brunt of this failure.
Hong Kong. The Battle for the Island, 19-25 December 1941
On the night of 18/19 December the Japanese landed six battalions in the area that the Battalion had recently handed over to the Rajputs. They quickly overran the Rajputs and moved swiftly to the south-east to secure the high ground of Jardine’s Lookout (JL) which dominated WNCG. 2 RS, at Wanchai Gap, were ordered to stand fast, facing east on a north-south line to prevent the Japanese from moving towards Victoria. At this time, and through to 1100 on the 19th, Fortress HQ believed that only two Japanese battalions had landed on the Island. By dawn it was clear that the Japanese were threatening West Brigade HQ at WNCG. At 0700 the Battalion was ordered to send A Company, the Fortress Reserve, with all possible speed, to help relieve Brigade HQ which was by now surrounded and under severe threat. Thirteen minutes after receiving the order they were on their way by truck. They debussed some way short of WNCG and then advanced, deployed, up the road. The Company was soon pinned down by heavy fire from JL a few hundred yards short of WNCG itself. A few members of the Company, including two Sergeants, managed to fight their way through to the Brigade HQ. Soon after 1000, however, Brigadier Lawson made the decision that the only possible course of action was for those surviving to fight their way out. This they did but not one, including the few reinforcements from A Company, survived. A Company continued to hold its forward position until midday but, with mounting casualties (the effective strength of the Company had been reduced from 76 to only 15), the OC and 2ic wounded and the only other officer killed, Sgt Whippey organised their withdrawal to Battalion HQ., which had now moved to a position north of WNCG. This he successfully achieved, an action, combined with further acts of considerable leadership during the fighting on the Mainland, earned him the subsequent award of the Military Medal.
The loss of Brigade HQ was serious, the fact that the Brigade Commander was not replaced for 24 hours was even more so as there was now no coordination for Brigade actions. This was compounded by the fact that East Brigade, commanded by Brigadier Wallis who had been the Mainland Commander, was allowed by General Maltby to retreat in front of the Japanese to the Stanley area. This move, subsequently described by the War Office historian as “a major tactical error” and “disastrous”, meant that within 24 hours of landing the Japanese had physically split the defending forces in two.
At 1330 Colonel White had been ordered to leave all his positions on the Wanchai Gap and to hurry eastwards to try to restore the position at WNCG, which had become critical. To achieve this would require securing JL and the capture of the police station standing on a knoll above the road. Wired by the Garrison before hostilities began, the station dominated the immediate approaches to the Gap from all directions and was now strongly held by the Japanese. Since early that morning it had been attacked from the south by parties of troops sent in driblets to drive the enemy from the area of the Gap. These included a company of the Winnipeg Grenadiers, a Royal Navy party from Aberdeen fighting as infantry, who were ambushed en route, a composite group of Royal Engineers with more Navy personnel and finally, after dark, by a force of 100 Indian gunners under Major Hunt and supported by two armoured cars from the Volunteers. Despite the fact that they had inflicted heavy casualties on the enemy, all the assaults had been driven back with heavy casualties themselves. The reason for this waste of effort and lives was due, at least partially, to the fact that there had been no coordinated plan to counter-attack WNGC, nor could there be with West Brigade HQ overrun and no new Brigade Commander appointed, and East Brigade HQ withdrawing to the south.

The Wong Nei Chong Gap in 1941. Looking south from the main direction of approach with the police station on the top of the knoll to the right of centre. The steps leading up to it can be seen as a thin line running up the hillside. The main road from Repulse Bay is on the right with Mount Nicholson looming behind it. Jardine’s Lookout would be to the left rear.
Returning to 2 RS and their move from Wanchai Gap in the early afternoon. A Battalion attack on JL, less A Company, was planned. A composite force, formed from what remained of HQ Company and B Company was to advance via the south of Mount Nicholson to WNCG while C Company, advancing up Blue Pool Road was ordered to attack the south-west side of JL from the valley below. On the original plan D Company, supported by the three remaining carriers and some Vickers MMGs mounted on trucks, was to come up the main road from Causeway Bay swing left on a side road and come in on the left of D while supported by the MMGs firing from the slopes above Tai Hang Road. Artillery support was promised but in the event none was received. D Company had just begun its move when Fortress HQ informed the CO that WNCG was believed to be, for the moment, very lightly held, if at all, by the Japanese and D Company was to push on direct for it at best possible speed. While the Battalion, after A Company’s experience of that morning, received this news with incredulity, the carriers, with two sections of MMGs were ordered to push on while D Company followed on foot up the road at best possible pace. Sadly the information proved to be incorrect and the Company came under very heavy fire in same area as A Company had been caught earlier The leading carrier suffered a direct hit from a mortar bomb killing all in it. The other vehicles managed to turn round and seek cover while the main body sought cover off the road which was not easy as the road had been cut out of the hillside with steep slopes above and below it. Attempts were made to fight a way forward but these were unsuccessful and it was decided to withdraw a short distance and to await nightfall. The composite force and C Company had both faced similar problems and been forced to halt by very heavy Japanese fire from JL where the Japanese were now dug in and using the pillboxes that were located there.
After the failure of the Gunner attack, at around midnight, Major Hunt made his way through WNCG and met with Captain Pinkerton, OC D Company, and told him his force had now ‘dispersed’. Captain Pinkerton and D Company immediately moved up the road, this time unheeded, to WNCG in the darkness to attack the police station, the capture of which was essential if JL was to be cleared and the main route to the south reopened to link up again with East Brigade. There were only two ways of attacking the station; first, by a direct frontal assault across a flat but very exposed, short stretch of open ground, unfortunately so narrow that it only allowed one platoon to deploy at a time; and second, round its right flank to attack it from the rear up a steep, thickly overgrown and wired bank which, in the end, proved too dense to get through in the darkness. With the need for speed, Pinkerton’s first assault was frontally with one platoon to get to the flight of steps leading up to the entrance. They were met with a hail of rifle and machine gun fire and, as they got closer, grenades thrown down on them. They could find no cover and were driven back with a number of casualties. A second platoon of D Company was dealing with Japanese snipers on Mount Nicholson and generally to clear the area to the west of WNCG. In the meantime the third platoon, under Second Lieutenant Jim Ford was working round the right flank. As they, unsuccessfully, tried to force their way up the slope Captain Pinkerton organised all available men and led a second frontal assault. He got up to the front entrance to the station but could get no further. He himself was wounded. Casualties were mounting and Ford decided to pull out and reorganise. He found Pinkerton half way up the steps and helped carry him back. For his superb fighting spirit and resolute leadership, both here and previously in holding Golden Hill on the Mainland, Captain Pinkerton was subsequently awarded the Military Cross. In his determination that the attack should not be halted he ordered Ford to carry out a third frontal assault. While he was preparing for this Ford’s elder brother, Captain Douglas Ford, arrived at WNCG with his composite party drawn from HQ and B Companies.
This group had had a difficult route moving in the darkness to join D Company north of WNGC via Back’s Link and across the shoulder of Mount Nicholson. They had come under heavy mortar and automatic fire. Captain Ford had left one platoon to the left of the track while the rest of the force struggled on over difficult ground. It was fortunate that Sergeant Sutherland, from the D Company platoon clearing to the west of the Gap, had climbed up alone to this bullet-swept hill-side and had made contact with them to guide them down to WNCG. For this, and many other acts of courage in the Hong Kong fighting, ‘Sandy’ Sutherland was awarded the Military Medal. One of the unfortunate features of 2 RSs assault on WNCG was that, after the initial approach had been halted in the afternoon, and the Composite Company had been delayed crossing Mount Nicholson in the dark, the Battalion had been unable to carry out the hoped for co-ordinated attack, two companies strong and with MMG support, on the police station that night. Captain Ford now took command of all Royal Scots at the Gap and led the composite force rapidly across the open ground while his brother, with the remnants of D Company, once again tried the right flank and to work up through the scrub and wire there. This time the frontal assault reached the station but could not break in and was taking heavy casualties. The only hope was that the platoon on the right flank would at last succeed in penetrating the defences there. When this proved impossible Captain Ford decided to withdraw the survivors from a hopeless position in which complete annihilation would be certain with the coming of daylight. During the fighting on 19 December the Battalion had lost4 officers and 20 soldiers killed and 4 and 48 wounded, effectively a company’s worth of casualties in a day.
Thereafter Captain Ford’s force withdrew to positions on the lower slopes of Mount Nicholson from where it could overlook WNCG and prevent any enemy movement westward. The rest of 20 December was, for those who had pulled back, rather quieter, despite continuous mortar fire, unceasing rain and a lack of food. A move further up Mount Nicholson would have provided greater security but to control WNCG it was necessary to stay on the lower slope and there the Japanese could fire down on them from JL. Indeed B Company had to withdraw from Mount Nicholson to the area of Battalion HQ shortly after daybreak when they found the position they had occupied in the darkness to be untenable. Towards evening the Japanese attacked Captain Ford’s right flank. Captain Ford saw that he would be sacrificing every man in his depleted force to no good purpose if he held on. Ordering his brother and a few men to cover their retiral he led his party down to Battalion HQ which was now established on Tai Hang Road near St Albert’s Hospital.
While those on Mount Nicholson had been holding on, B Company of the Punjabis on the left of 2 RS, and occupying a knoll north of JL, which was believed to be now held by 500 Japanese with mortar and light artillery support, had asked for help. A Platoon of C Company were sent to reinforce them for as long as they were needed. There was, however, a 400 yard gap between the Punjabis and C Company, Colonel White ordered B Company less one platoon to that area. Placing his two platoons on the lower slopes of JL but suffering casualties en route, Lieutenant Glasgow led a party up the hill to Sir Cecil’s Ride and managed to ambush and inflict heavy losses on Japanese who were advancing along the track. After returning to the platoons, Glasgow realised that come daylight they would be very exposed to Japanese mortar fire directed from higher up on JL. He had already lost nearly a quarter of his men. He therefore pulled back to a slightly less exposed position above the Tai Hang Road while another platoon was sent to fill the gap to the Punjabis.
At first light, about 0630, on the 21st,, B and C Companies were attacked from the direction of WNCG. The attack was broken up with heavy casualties inflicted on the enemy. Lt Stancer, who was commanding C Company, was wounded. Captain Cuthbertson, the Adjutant took over as OC and Captain Ford took over as Adjutant. A further attack astride Blue Pool Road against C Company succeeded in penetrating their forward positions but a spirited counter-attack with the bayonet forced the Japanese back and allowed the line to be stabilised. The Company was now only 30 strong but the Battalion were still astride the Tai Hang and Wong Nei Chong Roads. Casualties on the 20th and 21st totalled 19 killed and 36 wounded.
The Battalion position and strengths on 22 December was: A Company, approximately 20 strong holding the Petrol Pump crossroads supported by the one remaining carrier; C Company, less the platoon still with B Company of the Punjabis, approximate strength 30, astride the Tai Hang Road; B Company approximate strength 50, astride the Island Road some 200 yards south of the Petrol Pump, and the handful of D Company remaining resting near Battalion HQ on Stubbs Road, just north of Petrol Pump. At about 1130 all positions came under heavy mortar fire followed by an attack which failed to penetrate and the Japanese were forced to withdraw. Fortress HQ had learned that the Japanese were working their way round the slopes of Mount Nicholson and even over to the south of Mount Cameron. Black’s link was open to them as far as Middle Gap so it could only be a matter of time before the Battalion was attacked from the rear. At 1300 the Battalion was ordered to withdraw that night to a line west of Nicholson Camp, extending north astride Island Road which was to be blocked. The withdrawal was to begin at 1900. At 1800 Battalion HQ, which must have been located by the Japanese, was heavily mortared, Amongst the wounded were Colonel White, who declared himself able to retain command, and Major Walker the acting 2ic. Captain Ford now assumed that appointment as well as Adjutant. At 2100 the Battalion reported to Fortress HQ as being in its new positions, having disengaged from the enemy without incident.
At 0200, the Battalion having no means of contact with West Brigade HQ other than by runner, a despatch rider from Brigade brought a message saying Mount Cameron had been captured by the enemy. Colonel White decided to withhold this information from his Battalion and told only Captain Ford, now the next senior officer and who might have to command. Those from Mount Cameron were reforming at Mount Gough and Brigade HQ was moving to Magazine Gap. It appeared, therefore, that both the Battalion’s flanks were exposed. All ranks were by now extremely tired, companies were weak in numbers and only a few effective officers (two companies were being commanded by Second Lieutenants) and senior NCOs remained. Colonel White therefore ordered them to lie ‘doggo’ with absolutely no movement during daylight and replied to Brigade that, unless otherwise ordered otherwise, he did not propose to withdraw further to the Wanchai Gap area until after dark. At about 0900 the enemy attacked but, although the forward positions were driven in, the enemy were repulsed and did not attack again until after dark. By 1730 the Battalion, less D Company, had withdrawn to the Wanchai Gap and the positions on Mount Cameron which was found to be unoccupied by the Enemy. In the early evening D Company positions were heavily mortared followed by an attack which forced them to withdraw to the north having suffered heavy casualties (relative to the actual remaining strength of the company) including the OC and Second Lieutenant Ford, the only officers left in the Company, both being wounded. In the early hours of the 24th the seven survivors rejoined the Battalion. Casualties on 22 and 23 December totalled 25 killed and 63 wounded – another company lost. Second Lieutenant Ford was subsequently awarded The Military Cross “for his untiring energy, courage and good leadership on both Golden Hill on the Mainland and his subsequent actions on the Island”.
24 December was a relatively quiet day by comparison with those before, nevertheless a further seven were killed and fifteen wounded. One area of progress, unfortunately rather late in the action, was the delivery of 200 pairs of brown PT shoes for use at night. It was estimated that their arrival improved the Battalion’s patrolling by 100% that night – sadly on what was to be the last one. A Company, 14 strong, and D, only 7, were sent back to rest that night having fought almost continuously since 9 December with no rest and little time to reorganise.
In the early morning of 25 December, Christmas Day, the Battalion was attacked but no penetration was made. General Maltby had earlier sent “Xmas greetings to you all. Let this day be historical in the proud annals of our Empire. The order of the day is Hold Fast.” At 0900 Fortress HQ ordered that no offensive action was to be undertaken until 1100 as some women and children were being conducted through the fighting lines from Repulse Bay to Wong Nei Chong. This ‘truce’ was pretty one sided as Colonel White observed “during this …. the enemy moved troops forward, and bombed, shelled and mortared all known positions. When we requested permission (from Fortress HQ) to dispose of an enemy mortar which was being dug in some 200 yards to our front, permission was refused on the grounds that we were not being attacked until the mortar actually fired on us.” The Battalion’s last Bren carrier had been captured by the Japanese but, in a daring sally, Corporal Stewart of C Company recovered it and drove it back. Supported by artillery, mortar and machine-gun fire (and later aircraft), the Japanese made an all-out attempt in the early afternoon to break through the Battalion and other units defending the Island HQ. C Company were ordered to withdraw to a police building, subsequently set on fire by incendiaries dropped from the air, while the other three companies, reduced to a skeleton force, doggedly held their positions. Colonel White was ordered to report personally to Brigade HQ, He was most unwilling to leave his Battalion at this critical moment but, soon after arriving there, an order was received to return to the Battalion and fly the white flag. Not believing it, Colonel White contacted Fortress HQ and spoke to Colonel Newnham, the GSO 1, who assured him the order was genuine and must be obeyed at once for General Maltby considered that “further fighting was useless slaughter and the white flag must be flown.” - so much for his Xmas Greetings of earlier that day!
At 1640 Colonel White returned to Battalion HQ and informed Captain Ford, Lieutenant Glasgow, Second Lieutenant Fairbairn and the RSM of the order and, at 1643, the white flag was hoisted. The Jocks were as disbelieving of the news as their CO had been. They had reconciled themselves to ‘ a fight to the finish with the Nips’. Indeed, when a runner was sent with the news to Second Lieutenant Hamilton whose platoon was slightly isolated, he put the man under close arrest and sent one of his own men to Battalion HQ to find out the truth. Weapons were unloaded and a roll call taken of all ranks still in action’ This came to 4 Officers and 98 other ranks. The total casualties suffered by the Battalion since 9 December were:
Killed Officers 12 Other Ranks 95 Total 107
Wounded 17 213 230
Total 29 (88%) 308 (54%) 337
There was one isolated area of Christmas cheer that day. Lieutenant Drummond Hunter the Intelligence Officer, had been wounded in the fighting on the Island and evacuated to hospital, There he was married, one hour after the surrender, to Miss Peggie Scotcher, a Volunteer nurse. She was interned at Stanley whist he was in a POW Camp. They did not meet again until after the Japanese surrender
Any final view on the defence of Hong Kong is best summarised in the words of Winston Churchill; “The Garrison were faced with an impossible task that from the outset was beyond their powers”.
It fell to the 2nd Battalion, understrength through illness, lacking experience in a number of key appointments, far too thinly stretched over difficult ground and, along with the higher command, ill-prepared to oppose the better trained, better equipped and more experienced Japanese forces, to face the brunt of the enemy attack at the outset of hostilities. Many officers and soldiers performed well during the fighting on the Mainland and, those who survived, throughout the heavy fighting on the Island (where nowhere were they broken through) gave of their very best. For that, and for their subsequent conduct during nearly four years of dreadful captivity, the 2nd Battalion occupies a special place in the history of the Regiment.
Aftermath. After the fall of Hong Kong twenty-two officers and 608 soldiers of the 2nd Battalion became prisoners of the Japanese. Of that number three officer, including Captain Douglas Ford GC executed (murdered) by firing squad, and fifty-nine soldiers died in captivity and a horrifying three officers and 178 soldiers died at sea as a result of the Lisbon Maru incident.
Captain Douglas Ford GC
Captain Douglas Ford was in command of The Royal Scots in Sham Shui POW Camp on the Mainland. He made contact with loyal Chinese outside and thus badly needed medical supplies were smuggled in to help sick men who were slowly dying through lack of proper medical treatment. Later on, Captain Ford hoped, a break-out from the camp might be possible. Word was secretly passed to General Maltby and a link was formed with the British Intelligence authorities in China who promised to help when the time of escape drew near. Unfortunately, due to the carelessness of a Chinese messenger, the Japanese got wind of this and several officers and Sergeants were arrested by the Kempei, the Japanese Gestapo. Suspecting that officers of high rank were implicated, the Japanese resorted to torture in order to get the names and evidence they wanted. Because he accepted full blame, special torture of the most ruthless kind was used on Captain Ford. His steadfast refusal to give anyone away, even at times of great physical agony, evoked the surprise and admiration of his torturers. From his arrest on 10 July 1943 he was held in solitary confinement on starvation rations. Along with others he was eventually brought to ‘trial’ on 1 December on charges of espionage (an illegal Court Martial as Captain Ford, as a British Officer, could not be subject to Japanese military law). He was sentenced to death along with his co-accused officers, Colonel Newnham of The Middlesex Regiment and Flight Lieutenant Gray RAF. Three Sergeants, including one from the RAF and another from the Canadian Signals, who were tried on lesser charges, were each sentenced to 15 years hard labour. Ford then lay for eighteen days with no hope of reprieve and the certain knowledge that he would not get even one square meal or five minutes exercise in the open air before his death, yet he never lost his courage. When taken to the place of execution with the other two condemned prisoners, both of them, like him, sick from malnutrition and torture, his resolution was such that he was able to help them from the truck. As the junior officer he took up position on the left of the three but the Japanese officer in charge of the firing squad, having heard of his courage, insisted on his standing in the senior position on the right. And so Captain Douglas Ford met his death. Subsequently all three officers were posthumously awarded the George Cross, the United Kingdom’s highest award for heroism not involving military action, and a unique distinction within the Regiment. Colonel White left this fitting tribute: “Captain Douglas Ford’s cold, calculating courage, soldierly behaviour and conduct at this time might conceivably have been equalled in the proud annals of the Regiment, but it certainly could not have been surpassed.” He is buried in Stanley Military Cemetery.
Two soldiers, Privates Gallacher and Hodges managed to escape from the Sham Shui Po Camp. Making their way out of Japanese-held territory they reported to the British authorities in China who arranged for their transport home. For their courage and success they were both awarded the Distinguished Conduct Medal. Gallacher subsequently served with the 8th Battalion in North-West Europe, while Hodges served with the ‘new’ 2nd Battalion in Italy, Both survived the war. Gallacher remained a Regular, and, as a Corporal, was killed while serving with 1st Battalion, The King’s Own Scottish Borderers in Korea on 20 May 1951.
Somewhat similarly Captain Pinkerton MC, after recovering from being wounded, survived as a POW, served in Korea and then was killed in Port Said during the Suez operation on 15 December 1956.
Nemo me Impune Lacessit
(No one dares me with impunity – The Regimental Motto)
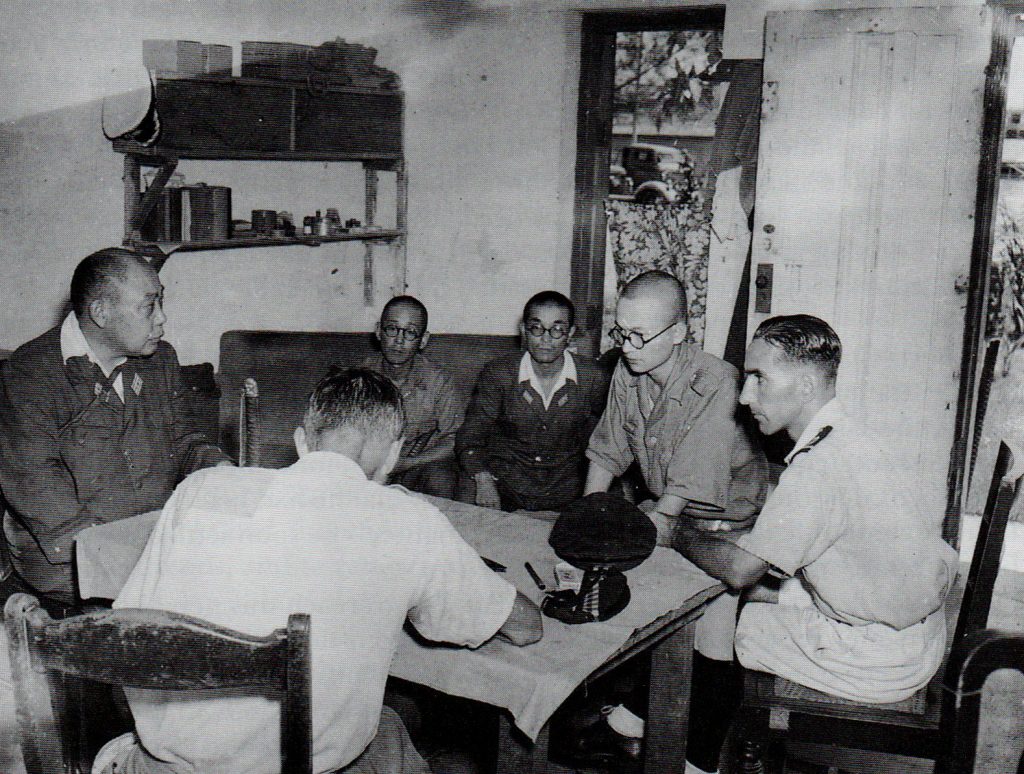
Lieutenant Colonel Simon White (back to camera) interrogating Colonel Tokunaga, the Japanese Commander of POW Camps, in September 1945, after the surrender of the Japanese in Hong Kong,
Further Reading: WW2 Essay Lisbon Maru; The Thistle October 1946 and January 1947- 2nd Battalion (Old) 1940-45, October 1946 -Sinking of the Lisbon Maru, November 1946 -Osaka POW Camp, July 1946 - Recuperation in New Zealand, July 1946 – Posthumous award of the George Cross, October 1950 – A Fortnight in Hong Kong, 1945. There are also articles on The Recovery of the Regimental Colour (April 1946) and Mess Silver (October 1947) and in the Essay on Regimental Silver on the Regimental web-site Museum and Heritage; PPB pp 93 – 132.
THE ‘NEW’ 2nd BATTALION
On 16 January 1942, only three weeks after the surrender, the Adjutant-General wrote to The Colonel of the Regiment to inform him that “The Army Council has decided that it is very desirable….That the 2nd Battalion, The Royal Scots, which was unfortunately lost at Hong Kong, should be reconstituted at once.” The letter went on to say that the 12th Battalion, itself formed from the 50th Holding Battalion in June 1940, would be redesignated the 2nd Battalion. This took place formally on 28 May 1942.
12RS had been deployed on coastal defence duties in Aberdeenshire and Northumberland until moving, in October 1941, to the Shetlands where it was stationed as part of the defence force at the time of redesignation. Throughout 1942 it trained very hard in the expectation of being posted overseas on operations. In November 1942 it moved to Caithness and then, in March 1943, to St Andrews and the rumour that it was destined for ‘a tropical clime’. On 14 April the Battalion sailed from the Clyde but the ‘tropical clime’ turned out to be as part of the garrison of Gibraltar. This was a huge disappointment to the whole Battalion who were in peak condition and highly trained for battle. Further garrison duty was the last thing they wanted or expected.
The Battalion endured fifteen boring months at Gibraltat where, inevitably, its training, other than physical fitness, suffered considerably. The only reasonable training facilities that existed were in North Africa and, due to commitments in Gibraltar, it was only possible for one company to train there at a time, and then only for short periods. Relief did not come until July 1944 when 2RS received orders to move immediately to Italy from where many experienced units, both British and American, had been withdrawn to take part in the landings in Normandy and, later, the south of France.
The Battalion disembarked at Naples from Gibraltar, in company with 1st Bn The Hertfordshire Regiment, on 29 July. Both Battalions spent a week drawing up transport and stores before moving to the Piedmonte area where they linked up with 11th Bn The Lancashire Fusiliers, who had come from Malta, to form 66 Brigade. The original plan was to undergo a badly needed, three month, intensive training period working up to operations at brigade level. Circumstances, however, precluded that opportunity as it was clear that, unless operations started immediately, there would be no opportunity before the onset of the Autumn rains and bitter winter to break through the immensely strong Gothic Line, constructed by the Germans along the up to 6000 foot high ridge line of the Appenines, running from coast to coast across Italy north of Florence. Furthermore the reduced strength of the Allies could result in the Germans further reinforcing the Gustav Line and wresting the initiative back from them.
By 21 August 66 Brigade, now forming part of 1st British Infantry Division within the US 5th Army, commanded by General Mark Clark, had moved up to an area just to the east of Florence. The Division’s objective was to the east of Bologna and the plains of Lombardy where they were to link up with the 8th Army. The 1st Division was to use ‘Arrow Route’, a relatively minor route following the valleys, running from Florence through Borgo San Lorenzo to Faenzo some 10 miles south-east of Imola, while the US 85th Division pushed up Route 65, the main Florence to Bologna road. B Company of 2RS were immediately deployed securing Revezzano Ford a key crossing on the River Arno about two miles east of Florence from where the other Companies carried out an aggressive patrolling programme to probe the German positions in the foothills south of the Appenines.
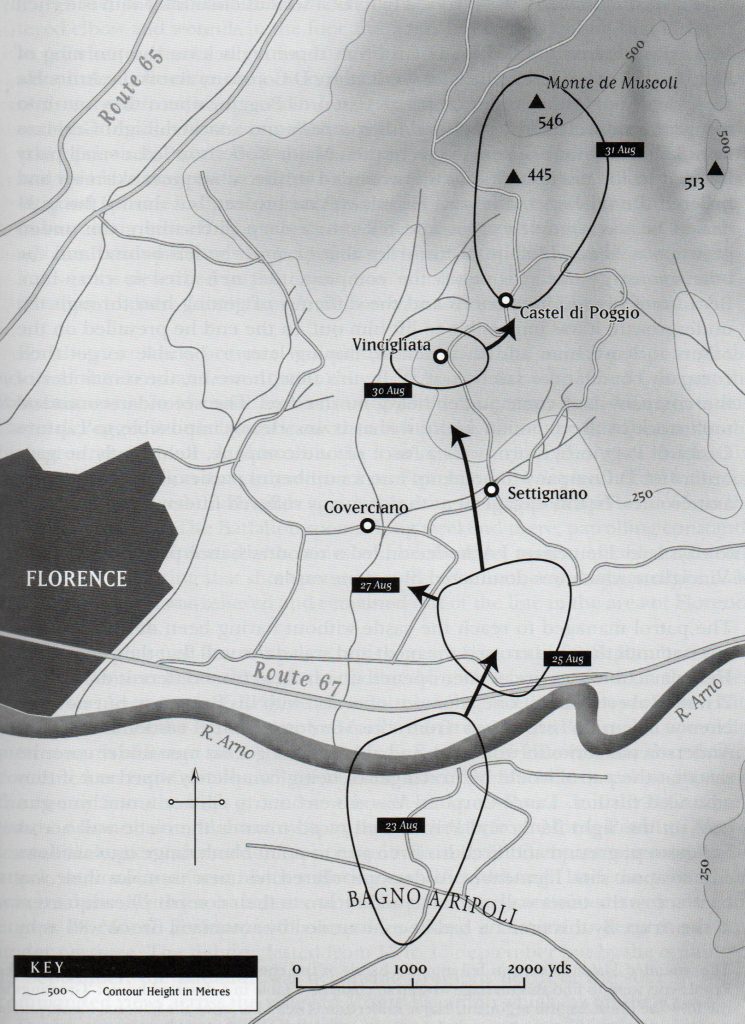
Crossing the Arno 25-31 August 1944
These had a number of clashes with stay behind parties. The most serious was on 25 August when D Company, led by the OC, Major Robertson, was tasked to secure the high ground at Castel Di Poggio (quite literally a medieval Castle) about three miles north of the Ford and which had been identified as a German stronghold. A company attack secured the high ground with eight Germans killed and four captured. Major Roberson then led a small party to the Castle itself. They came under heavy fire and were forced to withdraw. Major Robertson was wounded twice and it proved impossible to evacuate him. By this time the rest of D Company had come under heavy mortar fire and were themselves forced to withdraw having suffered one killed and 14 wounded. Major Robertson was captured by the Germans but survived his wounds as the Battalion later learnt when they found a message written in chalk on a table in a deserted farmhouse which read “Greetings to the RS – the finest English (sic) regiment. Major Roberson is well.”! Nevertheless, a bridgehead two miles deep had been secured in only four days after the Battalion had commenced operations. Two days later a fighting patrol was sent to the hamlet of Vincigliata about half-a-mile south west of Castel di Poggio, and again dominated by a stone castle. This time the patrol managed to scale the wall before they were seen and came under heavy fire from different directions. Private Robert Bell, a Bren gunner, managed to silence one of the German machine guns while Lieutenant Anderson, the patrol commander withdrew the patrol, which was in danger of being wiped out, back across the outer wall and moat He was wounded whilst doing this and again subsequently. Bell covered this withdrawal by racing up to the Castle wall and firing his Bren gun at point-blank range into windows and weapon slits. He continued to cover the patrol as it withdrew out of action leaving Lieutenant Anderson, on his direct orders, behind. For his actions that day Bell was awarded the Military Medal. Anderson managed to get himself into some woods where he was found by an Italian partisan who helped him back to Battalion Headquarters. For his leadership he was subsequently awarded the Military Cross. On 31 August the Battalion advanced over the ground it had dominated over the last ten days to take the 1775 foot high feature of Monte de Muscoli, four miles north of the Arno, thereby securing the east flank of Arrow route for 1st Division to begin its advance North.
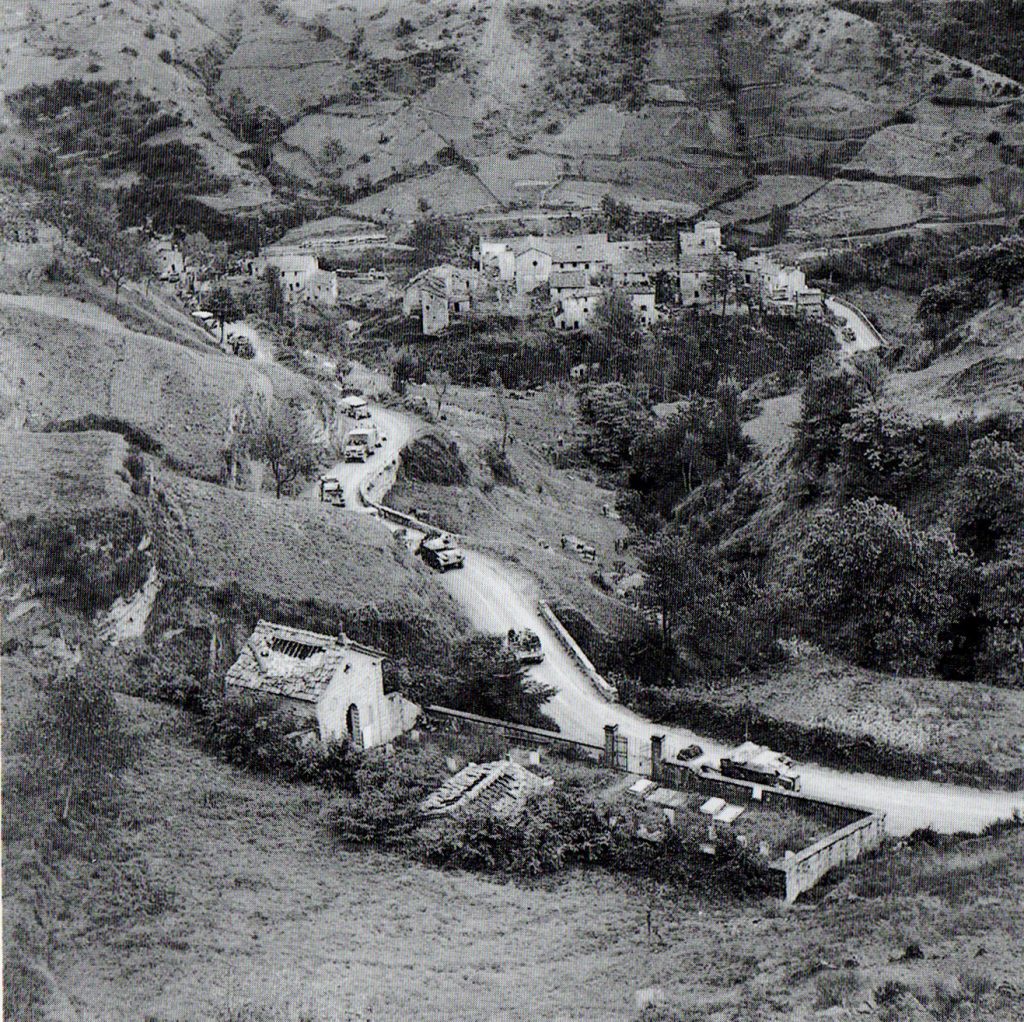
A convoy on Arrow Route
Much to its surprise the Battalion was withdrawn to Florence that night before being moved in transport the next day up Route 65 to the area of Montorsoli. They remained there until 5 September, patrolling constantly across countryside infested with mines and booby-traps, against an able and determined enemy from the German 4th Parachute Division, at a cost of 20 casualties. The most serious loss was when a stray shell knocked out the whole of D Company’s O group while they were recceing for a planned Battalion night attack on 2 September (later cancelled), killing two and wounding the remaining three (having already lost Major Robertson their OC). During one of the patrol actions, after the patrol was effectively surrounded by the Germans, Pte Thomson, another Bren gunner, although wounded in the shoulder stayed behind for fifteen minutes to cover the patrol’s withdrawal before, dragging his gun behind him, managing to rejoin them. For this action he was subsequently awarded the Military Medal. The Battalion returned to Florence on 5 September until 12 September when they moved forward to north of Borgo san Lorenzo to join the rest of the Division in the operation to break through the Gothic Line, with 66 Brigade playing the leading role. 2RS’s task, within 66 Brigade, was to clear the enemy from the high ground to the West of Arrow Route by advancing along the ridge line while the other two Brigades of the Division pushed up the road into the valley below. All supplies would have to be brought forward by mule-train. Fortunately both the CO and 2ic had been with the 7th/9th Battalion when they were training as a Mountain Division in the Cairngorms and were able to oversee the training of men from HQ and Support Companies in the loading of these animals. The following day the advance began on foot from the village of Pulicciano with B Company leading along the narrow spur leading up towards Mount Prefetto. Almost immediately patrols located defensive positions. The following morning the Company was strongly attacked and the forward position was initially forced back a short distance but they halted the attack and inflicted heavy casualties before advancing and regaining the lost ground, It had not been without cost however. B Company had now lost all its platoon officers and two sergeants. C Company, in the meantime, had been cut off for 16 hours in a hollow just below the crest line. With all senior to him killed, wounded or missing, Sergeant Gott organised the Company into a defensive position and, that night, led them back to rejoin the rest of the Battalion, bringing their casualties with them. For this outstanding display of leadership he was rightly awarded the Distinguished Conduct Medal. Assisted by the two other battalions in the Brigade the attack was pushed forward and, in less than 36 hours Monte Prefetto had been secured. After the Americans had captured Monte Patrone, the next objective was Monte Paganino, the highest point in that area of the Appenines and, in turn, one of the principal bastions of the Gothic Line.
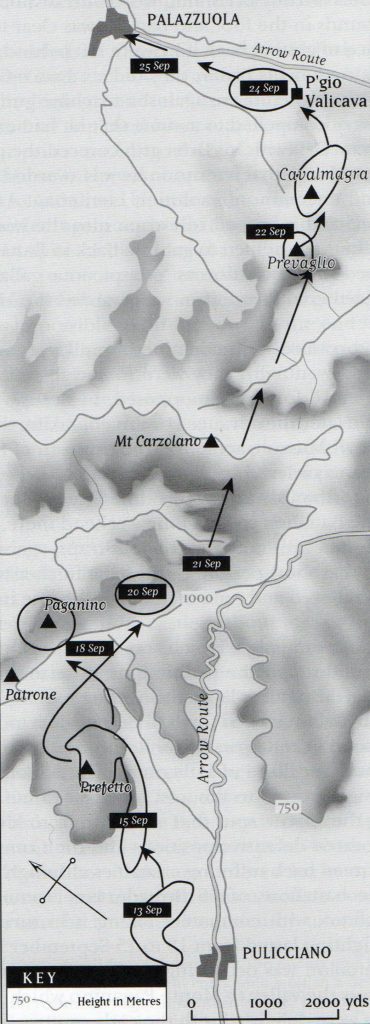
The Advance to Pallazuola 13-27 September
By this time the weather had broken and the autumn rains, which had begun a fortnight before with sudden drenches, were now coming down in long steady torrents. The attacking troops had to scramble up as best they could, often on hands and knees, carrying equipment, weapons, ammunition and food. As they climbed over rocks or clawed their way up through deep mud, they were halted every now and then by machine-gun fire. The dense undergrowth further impaired their progress but the Jocks were often grateful for the cover it gave them.
H-hour was at 1000 on the 19th. Before noon, A Company, leading the Assault on a ridge which was so narrow that it could only accommodate one, by now, weak company at a time, were within 300 yards of the summit having wiped out two machine-gun posts en route. At this point they came under further heavy machine gun fire supported soon after by sustained mortar fire. It was obvious that the summit was defended in considerable strength and, by 1400, only a further 100 yards had been gained, although at a heavy cost.
The Company went to ground and stayed there until dawn the next day when they rose from their hollows amongst the scrub and converged on the mountain crest and, fighting their way yard by yard into the midst of the enemy position, a small party was on the top by 0645. All around the summit the rooting out of the enemy from their defences began and, by 0920, after almost 24 hours of desperate fighting, without a break, the OC was able to declare that Mount Paganino was secure and the Gothic Line breached although not yet broken. Significantly, having crossed the watershed of the Apennines the mass of streams and rivers were now running north towards the plains of Lombardy.
Following the capture of Mount Paganino the lead was taken over by the other battalions of 66 Brigade, with the objective of the village of Pallazzuola, and 2RS moved into Brigade Reserve. They supported others as required as they advanced nearly thirty miles along razor edged ridges, across deep valleys and up again into the mountains, Every few miles small enemy positions, magnificently sited, well camouflaged and potentially almost impregnable, had to be stormed in the face of accurate Spandau and mortar fire. On 21 September, the Battalion advanced some four miles led by B Company, by now only 50 strong, but augmented with a platoon from A Company, to attack Monte Prevaligo. As night fell B Company were short of their objective so formed a tight defensive perimeter and dug in. At first light the Company stormed up the steep slopes and took the crest. From prisoners they learnt that the next feature, Cavalmagro, was strongly held. Nevertheless Major Mackenzie decided to maintain the momentum and two platoons headed down the forward slope, sliding and falling as they went, until they were within attacking distance of Cavalmagro. With covering fire from massed Bren guns on top of Prevaligo, under the direction of CSM Cameron (who played a major part in many of the 2nd Battalions actions and was later to be a most distinguished RSM of the 1st Battalion from 1953-59) the platoons stormed the first line of German defences but were halted by machine-gun fire from their left flank. Major Mackenzie led another platoon to clear that area and then established his Company on the mountain-top from where they beat off several counter-attacks. Major Mackenzie was subsequently awarded the Military Cross for his courage and leadership during this operation. By 27 September the Battalion was concentrated in Palazzuola.
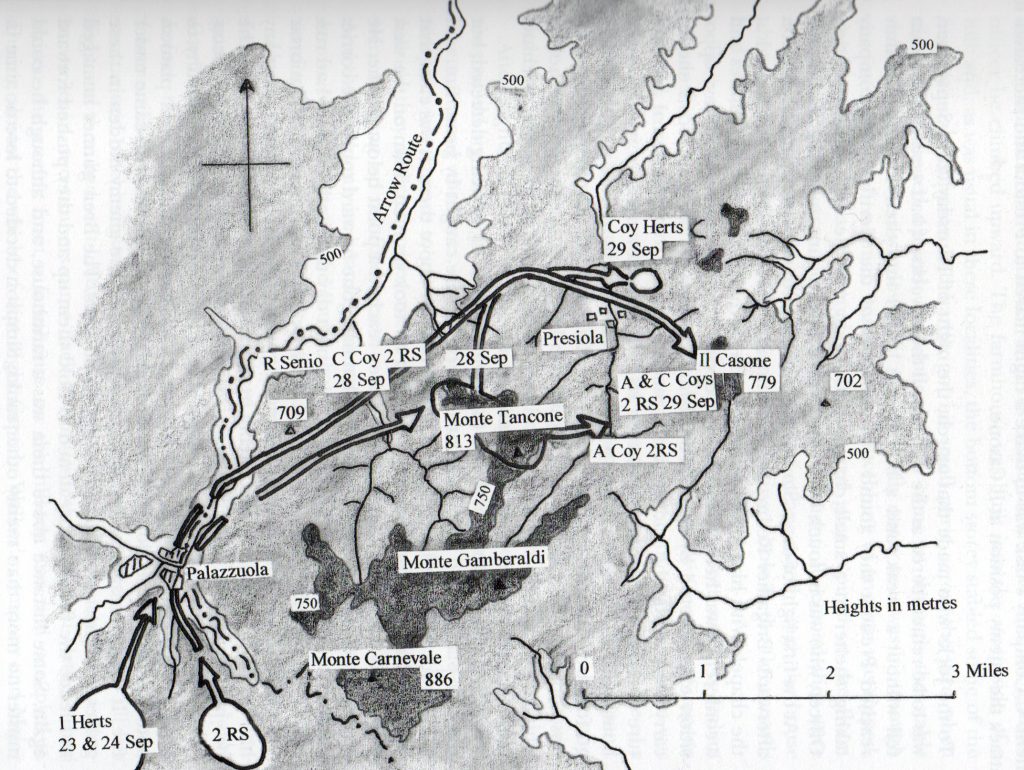
Action North of Pallazzuola, 28-30 September
The next night the Battalion detached C Company to support the Hertfords who were having trouble trying to secure the village of Presiola and the Il Casone feature some five miles further forward. To the Jocks who made that march the night was to be remembered as the worst in all these weeks of bad weather. The rain fell without a break, they were often up to their knees in mud and a bitter wind lashed their faces. When they reached Presiola they found the remnants of the Hertfords Company taking refuge in a small chapel. Soon after dawn the Brigade Commander and the CO of the Hertfordshires arrived at the chapel and it was agreed that C Company should take over the capture of Casone. This they duly achieved after a day and night of hard fighting in conjunction with A Company of 2RS. By the end of September the Battalion had been in action continuously for eighteen days, against a stubborn enemy, in demanding countryside and appalling weather, and was overdue a rest. On 30 September the position at Casone was handed over to 6 Gordons from 2 Brigade, and the only other Scottish battalion in the Division. The Battalion then had long march back beyond Palazzuolla before eventually meeting up with trucks to take them back to Borgo san Lorenzo.
The shortage of officers and men was now being felt more severely than ever. With the demands of reinforcements for North West Europe taking priority, there was no hope of getting replacements in Italy even to bring the Battalion up to a War Establishment that had been reduced by 5 officers and 108. 2RS, still far below even that, was reconstituted into three rifle companies, each seriously understrength. On 12 September they moved back to the front. They found that 1st Division had barely moved forward more than a couple of miles north of Casone to positions just south of Mount Ceco which had already changed hands several times in some of the bloodiest fighting of the campaign and which the Germans obviously intended to hold at all costs. The Battalion was assigned the role of right flank protection on the ridge south of Ceco which overlooked the Senio Valley to the left and the smaller valley of the Sintria to the right. This flank was completely open as the 1st Indian Division was lagging behind by some five miles. It was a busy, yet unrewarding, period for the Battalion. Patrol activity was heavy as attempts were made to establish the location and strengths of the enemy in the Sintria valley about a mile to the east of Mount Ceco. The Lancashire Fusiliers gained a foothold on the summit of Ceco on 13th October and the Indians at last came up. The Battalion now gradually infiltrated into the Sintria Valley. As the weather became steadily worse, the river became impassable and a block and tackle was used to ferry supplies across to the Battalion, which was now strung out three miles down the valley and a further two miles up into the hills on the far side. On the night of 27 October the Battalion relieved the Hertfordshires to the North and East of the Ceco summit. Two days later it itself was relieved, again by 6 Gordons, and, once more, returned to Borgo san Lorenzo remaining there until 8 November.
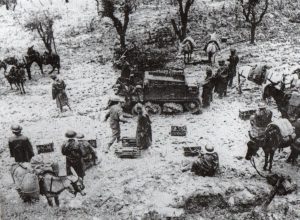
A carrier to mule re-supply changeover point
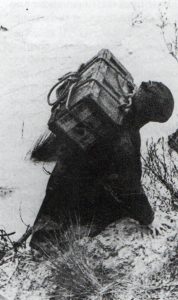
Final stage of re-supply – man-packing
By now it had become obvious that the exceptionally early and heavy rains, combined with the original shortfall in available troops and in the face of determined German resistance, meant that the Allied advance was halted at all points and, instead of being on the Lombardy Plain they would have to hold a winter line in the Mountains with re-supply lines stretching back sixty miles, over, in the British sector, few and very poor roads, certainly not what might be expected for a Divisional Main Supply Route (MSR) particularly with the standard British four wheeled lorry when compared wlth the big American six-wheel drive trucks which could go pounding over holes and through axle-deep mud and could even slog their way across open country. While the Americans were generous in their support, once the supply run forward to the Companies left the road, even jeeps could seldom cope. The supplies were usually transferred to Bren gun carriers which took them as far as they could to a change-over point to mules. Forward again to, in almost every case, the final leg of man-packing. Amazingly, thanks to the commitment of all concerned, the occasions when hot meals and other key supplies failed to get through were very rare. By contrast the German resupply line was now only a fifteen minute drive across the plain from the main road through Bologna.
On 9 November the Battalion returned to the line. The Americans had taken Monte Grande and established a salient some four miles wide but only half-a-mile deep forward of it. The inter-Division (and British/US Corps) boundary was now moved to the west and responsibility for the Monte Grande feature, and the salient to the north, passed to 1 Division. On deployment the Battalion occupied positions on the high ground less than two miles to the south of the summit. The three rifle companies were by now reduced to around 65 strong including stretcher bearers, signallers and others in Company HQ which made it very difficult to cover the ground allocated as well as maintaing vigorous patrol programmes and constant vigilance in defensive positions. On 18 November the Battalion was relieved and, once again, moved back to Borgo san Lorenzo for a short period of rest.
On 24 November the Battalion moved back up to the Monte Castellaro area to relieve 1st Bn The Duke of Wellington’s Regiment. The position, which was dangerously isolated, was the most northerly one on the whole Apennine front. An officer on the staff of HQ 1st Division described the Monte Grande sector “as a position to be held for a long time in bad weather, which had nearly every disadvantage and very few compensating advantages”
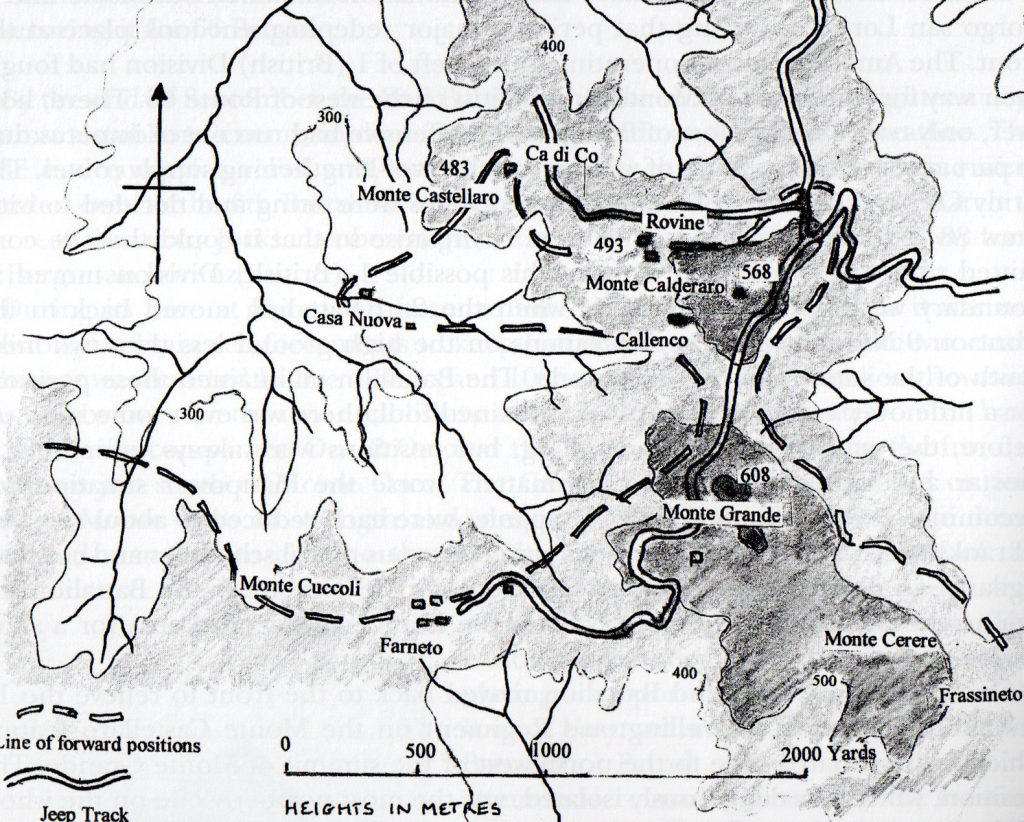
The Monte Grande Area 24 November 1944-8 January 1945
Battalion HQ was established at Callenco; C Company occupied the hamlet of Rovine on the shoulder of Mount Calderaro; A Company was to the right of Castellaro running eastward to the hamlet of Ca di Co; and B Company occupied the most isolated position of all on the summit and to the left of Monte Castellaro and, although the Company was just 56 soldiers strong, it had to provide a detachment of one officer, one sergeant and sixteen to man a liaison post with the Americans in the valley to the south-west at a farmhouse called Casa Nuova. Although this post was just a mile away the return journey due to the difference in height between the two locations, took three hours. For the next three days the Battalion manned these exposed positions, which were in view from elements of the 1st German Parachute Division ‘from their right front, their front, their left front and their left rear’. They were constantly under very heavy mortar and shell fire leading to a steady number of casualties. A veil of mist that shrouded the mountain-top meant that positions had to be strongly-manned and alert both by day and by night. The same 1st Division officer added that the sector had never been planned as a defensive position: on the contrary “the front line was simply one where the partially successful American offensive (to break out of the Apeninnes into the plain only three miles to the north) had happened to come to an end …. Its serious lack of depth made it difficult to recapture any position that might be lost”. The whole situation, isolation, weak in numbers, stretched over a considerable frontage and a strong enemy with good support close to hand, bore many similarities to that faced by the former 2nd Battalion on the Mainland in Hong Kong almost exactly three years earlier.
On the night of 28 November the weather began to improve. The whole Battalion area had been subjected to particularly heavy mortar fire that day, over 400 bombs in six hours. At 2300 the B Company post at Casa Nuova heard enemy patrols moving on the hillside between them and the main Company position. Soon afterwards the post was attacked and they withdrew into the farm house. Major Mackenzie sent a fighting patrol to support the detachment while he himself went forward to check on his own front, informing Captain Dick, the OC of A Company, that he wondered if the attack was a ruse to draw off men from their main position on the hill-top. Meantime it was reported that Germans were advancing on A Company’s right flank towards Ca di Co. This was halted by the Company’s Bren guns. At the same time Major Mackenzie returned to his now very depleted B Company. Almost immediately, and preceded by a hail of hand-grenades, a German force, having bypassed the listening posts forward of Monte Castellaro, attacked and captured the summit. Major Mackenzie rallied all his available troops and counter-attacked. In hand-to-hand fighting they recaptured the summit but lacked the strength to hold it when the Germans, having been reinforced, attacked again. Contact having been lost with B Company the CO had ordered A Company to send a patrol to find out what was happening on the top of Monte Castellaro, This patrol quickly ran into trouble in the fighting on B Company’s position. Captain Dick himself then set off to find his patrol and see what was happening at B Company. In his own words he never saw the patrol again. On the way back to reorganise his remaining two platoons, one still in Ca di Co, he heard and saw a party of Germans advancing towards his own headquarters; they were so close that he was doubtful whether he would get back in time to repel this attack. But suddenly, from the forward slope of his own company’s position, a Bren gun opened fire. The gunner, Private Preston, a sniper attached to A Company, and who had manned the Bren gun on his own initiative, continued to fire until he succeeded in forcing back the German party. Because his own company headquarters was now exposed to direct fire Captain Dick was forced to move to the reverse slope of the ridge. To thicken up the defence he withdrew the platoon from Ca di Co. At that point Major Mackenzie was brought in wounded and confirmed that the Germans now held Monte Castellaro. Having informed the CO of this, Captain Dick was ordered to hold fast while arrangements were made for a concentration of all available artillery to fire onto the top of Castellaro before any counter-attack was launched. This unfortunately meant a delay of three-quarters of an hour during which further German reinforcements had come up and all resistance had ended in the former B Company area.
Meanwhile a new threat had developed on A Company’s right flank from Germans who had occupied Ca di Co and were now working round to A Company’s right rear. Captain Dick requested the artillery to switch to this new threat and, as soon as they had, he led one platoon of the Company to attempt to recapture the former B Company position. Almost as soon as they set off they came under fire from a machine-gun which commanded the whole of the ridge running between the two positions. Once again Private Pearson stepped forward and neutralised the machine gun while Captain Dick led his force off the ridge into a hollow and up towards the enemy. As he prepared to attack he realised that with only six men left he had insufficient force to have any chance of success so went back to bring forward his last platoon. Leaving CSM Cameron, now with A Company, and about six men, some of them wounded, to secure the base, he led the platoon back again to launch the counter-attack. After a desperate effort by all ranks they succeeded in driving the enemy from the high ground. A rapid consolidation was necessary to meet the German’s next assault which was bound to develop. At that point Captain Dick was wounded, as was the only other officer, and there were further casualties. Realising that to hold on would only lead to the force being wiped out, he reluctantly decided to withdraw to his own base where he found CSM Cameron still holding on. It was obvious however that, with the coming of daylight, the enemy would be able to pick them off at leisure. On reporting this to the CO he was ordered to withdraw with all survivors, now down to 20, and join C Company at Rovine. It is doubtful if any of them would have got back but for, yet again, the action of Private Pearson who, again on his own initiative, covered the withdrawal until all were clear, when he followed them back. Not surprisingly he was awarded the Military Medal for all his actions that night. Captain Dick was awarded the Military Cross for his leadership. Only the lack of men had prevented him from holding Monte Castellaro which he had won back for The Royal Scots. The Battalion now reorganised into a single position consisting of C Company, including the survivors from A and B, and the Command Post. The reorganisation was complete by 0530 when the artillery fired concentrations onto A Company’s former position.
From midday on the 29th the enemy resumed heavy mortaring of the Command Post and C Company areas while preparations were made for a company from 2 Foresters to attack and recapture Monte Castellaro that night. The piquet at Casa Nuova, which had held out through the night, was resupplied. No attempt was made by the enemy to follow up on their success in taking the northern part of the salient. Just after midnight, as the Foresters were leaving for their counter-attack, an exceptionally heavy barrage of 110 mortar bombs in 45 minutes was launched on the Battalion position. Despite massive artillery support the attack came to nothing and, by 0420 on the 30th the remains of the Company, only some 40 strong were back in 2RS’s lines. Meanwhile Casa Nuova continued to hold out throughout that day but at 2205 1st Recce Regt, in the valley to the south of them, reported hearing heavy firing in the area and all communications were lost. Three separate patrols were sent out to try and re-establish communications the last of which found the buildings on fire. They got within 20 yards and shouted but got no answer before they came under fire. At 0800 on 1 December a patrol from 1st Recce got to the Casa to find it deserted and no sign of the B Company piquet.
While the loss of Castellaro was a severe blow to the Battalion’s and, indeed, 1st Division’s self-esteem (it was the only reversal suffered by the Division in the six-month period from August 1944 – January 1945) it was, realistically, due to its isolation, and the surrounding terrain, a very difficult position to hold and, probably impossible, against a determined assault by first-class troops. It was in no way, however, and in spite of many similarities, a repeat of the Hong Kong Mainland Battle of three years earlier. The Battalion, unsupported, had fought the enemy to a halt, giving up what was really only an outpost line and, in the process, losing 11 soldiers confirmed as killed; 3 officers and 36 soldiers wounded and 1 officer and 48 soldiers ‘missing’ - a total of 99 or not far short of half the 225 casualties suffered in their whole six months in Italy.
As a result of their losses, and effectively being only one rifle company strong, the Battalion was withdrawn from the front line on 2 December into reserve for two nights before moving south to Vallombrosa, some fifteen miles east of Florence, where it spent several weeks, including over Christmas, training and reorganising. On 31 December Lieutenant Colonel Delacombe, who had commanded 8RS in Normandy until wounded, took over command from Lieutenant Colonel Campbell and, that day, the Battalion moved back to the Monte Grande sector, this time at Frassineto, just to the south of Monte Cerere, where the snow was now lying to a depth of four inches drifting up to four feet. The first week of January passed relatively quietly but the weather was more of a challenge than the enemy. Then, to everyone’s surprise, it was suddenly announced that the 1st Division was to be relieved by the 85th (US) Division and to proceed to Palestine. 2RS was relieved on 8 January and set off on a long journey south reaching Taranto, a major port in Southern Italy, on 23 January and sailing from there on 26 January reaching Haifa on the 31st. At the time it was envisaged that the Division would return to Italy later in the year but, in the event, the war ended in May before they were due to return.
Not enough is known in, or acknowledged by, the Regiment about the re-constituted 2nd Battalion and its very hard six months fighting in Italy, overshadowed at the time by events in North-West Europe. It was very much an infantry war, in some extremely difficult country, and fought at the junior leader level with much patrolling and many platoon actions. This was recognised in the award of decorations and the relatively high proportion won by junior ranks, in particular private soldiers. These were:
Distinguished Conduct Medal 1 (Sgt Gott)
Military Cross 5 (including one to the Padre)
Military Medal 6 (including 3 to Private soldiers)
Mention in Despatches 8 (Lt Col Campbell, 2 Sergeants, two Corporals and 4 Privates)
After note: As well as those serving with 2RS a number of Royal Scots serving with other units in Italy received decorations. These included a DSO, three MCs and a MM. The Distinguished Service Order was awarded to Lieutenant JA McGregor. He had joined the 1st Battalion on commissioning from Sandhurst in 1938, and went to France with them in 1939. Having taken part as a rifle platoon commander in the withdrawal to Le Paradis, he was promoted to acting Captain in the post of Motor Transport Officer based at B Echelon so became one of the handful from the Battalion who escaped through Dunkirk. He was one of the first to join the newly formed Parachute Regiment and then later transferred to the SAS in North Africa. After the Italian surrender on 3 September 1943, following the Allied invasion of the mainland from Sicily, large numbers of Allied POWs broke out from the camps in Italy and made their way south hoping to reach the Allies’ lines. Lt McGregor led a party of seven who parachuted into the Chieti area, about half way up the Italian Adriatic Coast. In the space of a fortnight he sent 500 POWs on their way to freedom. Later he and his team caused further problems for the Germans before escaping in a stolen rowing boat back to the Allied Lines. The citation for this rare distinction for a subaltern, who had just turned 25, records it as being “for having maintained himself across enemy lines of communication for three-and-a-half months in the autumn of 1943”. By any standards he had a quite amazing war – and ‘peace’ afterwards – and readers are encouraged to read his obituary at:
https:/www.telegraph.co.uk/news/obituaries/1408949/Major-Alastair-McGregor.html
Further Reading: The Thistle April 1946 and PPB pp 166-187